CTP  Tech

InTheGarageMedia.com

Stop & Stay Stopped
Setting up the Rear of Our C10 Chassis With Modern Discs and an Electronic Parking Brake Combo
BY Taylor KempkesPhotography and Videography BY THE AUTHOR
M

ost people have heard that the front brakes of a vehicle do a majority of the work and, as such, are most important. Thanks to key factors, such as gravity and weight transfer, it makes sense that the front brakes tend to take the most abuse. But it’s a little known fact that a close Second Place goes to the rear brakes (with the tree you’re heading for coming in a distant Third).

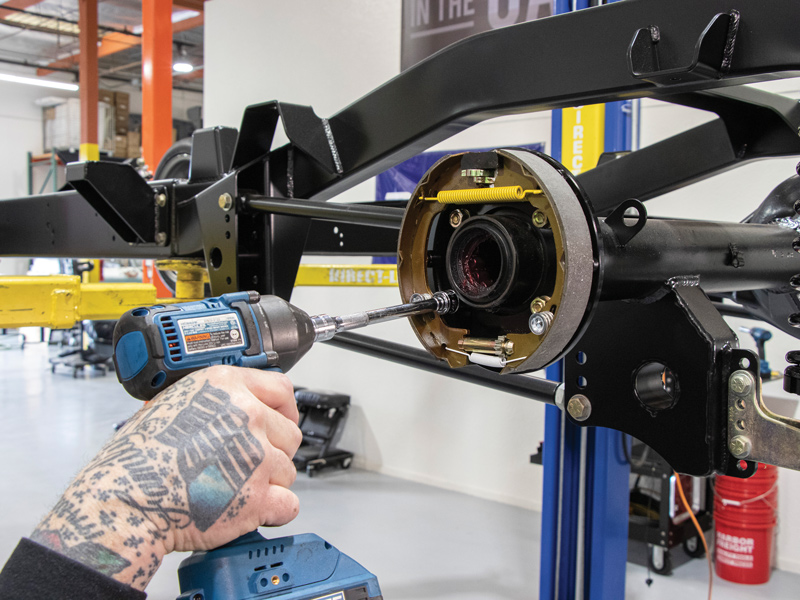
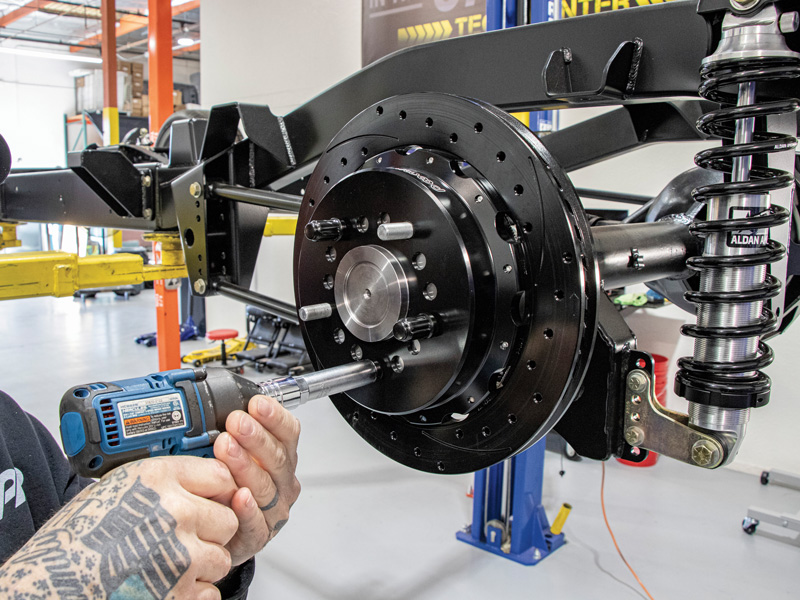
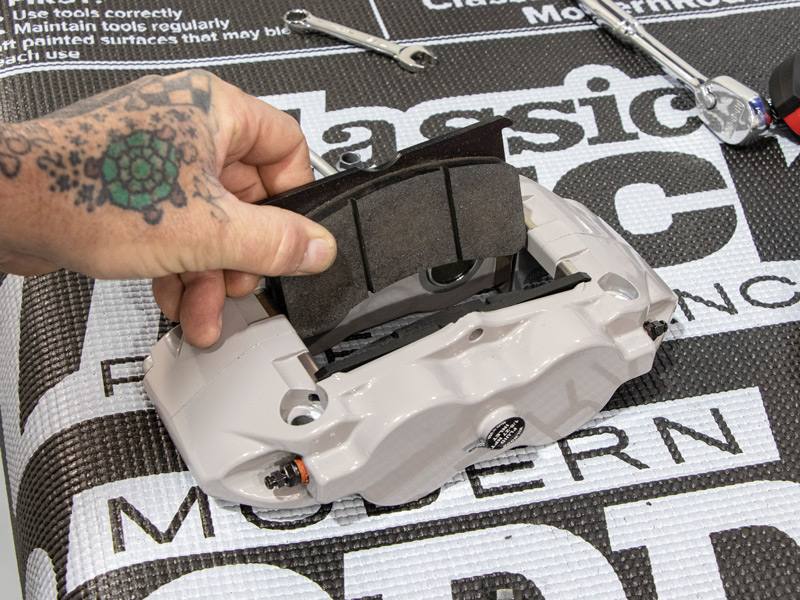
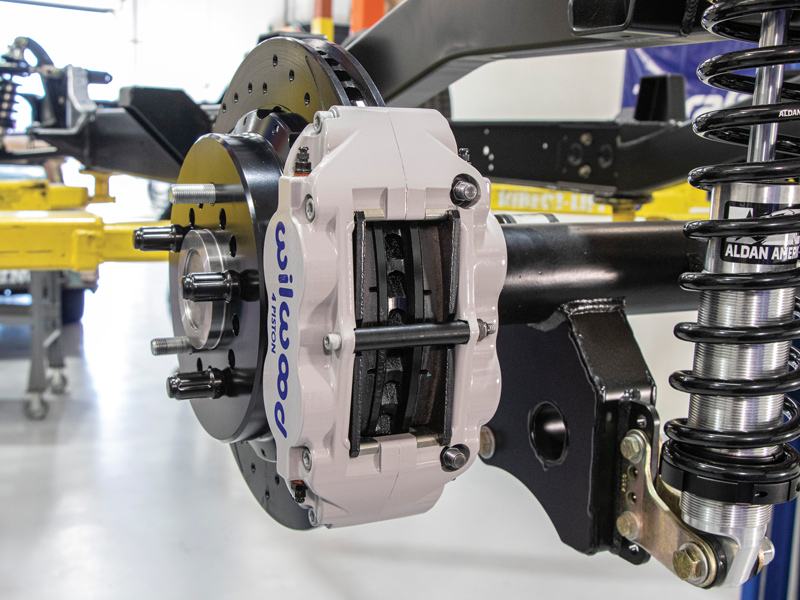
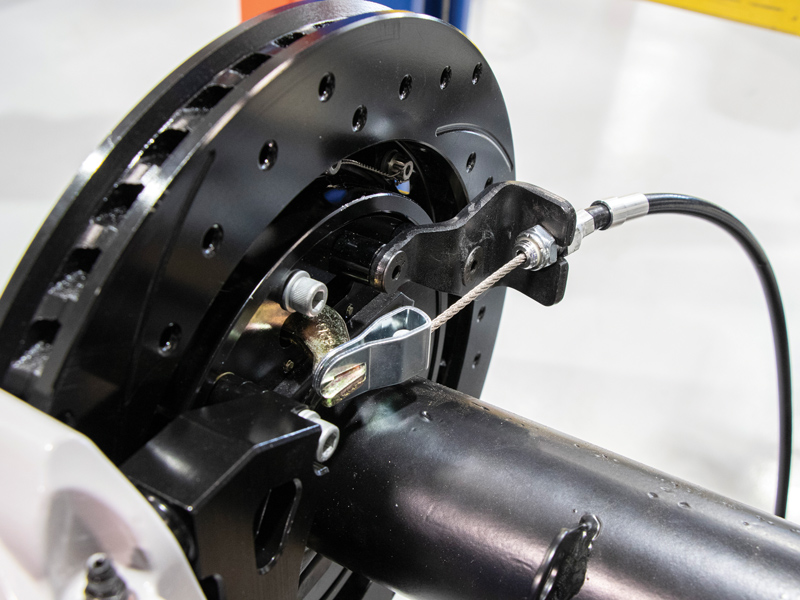
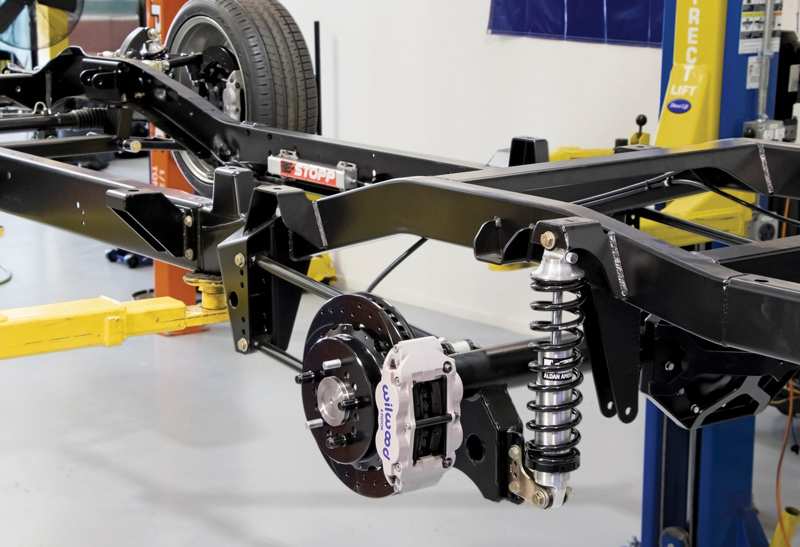
All jokes aside, if you’re on a tight budget you should still invest the money in a front disc brake conversion first. We did, which you can read all about it in the Apr. ’23 issue of Classic Truck Performance. Now it’s time to turn our attention to the rear of our ’64 Chevy C10 with a complete Wilwood disc brake conversion. We’ll also be pairing the modern rear discs with an equally modern electronically controlled parking brake setup from E-Stopp. Not only will these brakes do their part in supporting the front brakes but, sitting behind a set of 18- or 20-inch wheels, they’ll look the part, too.

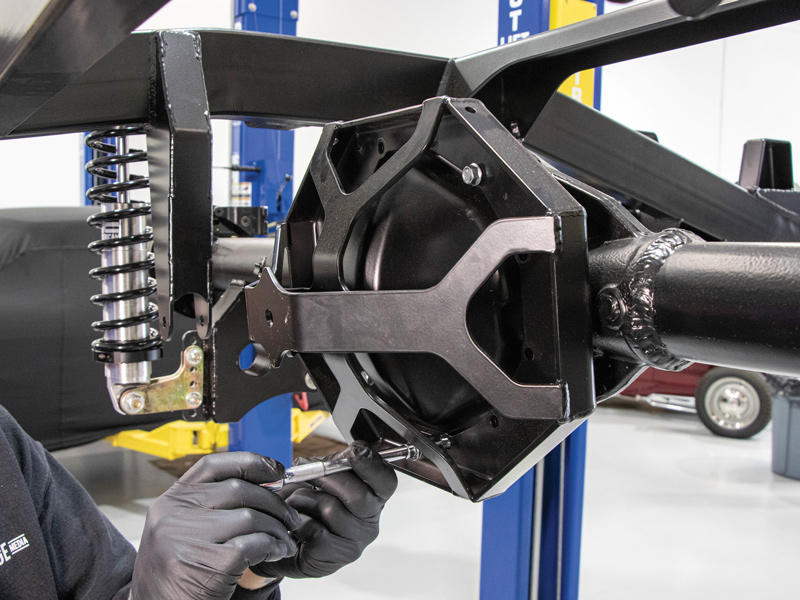
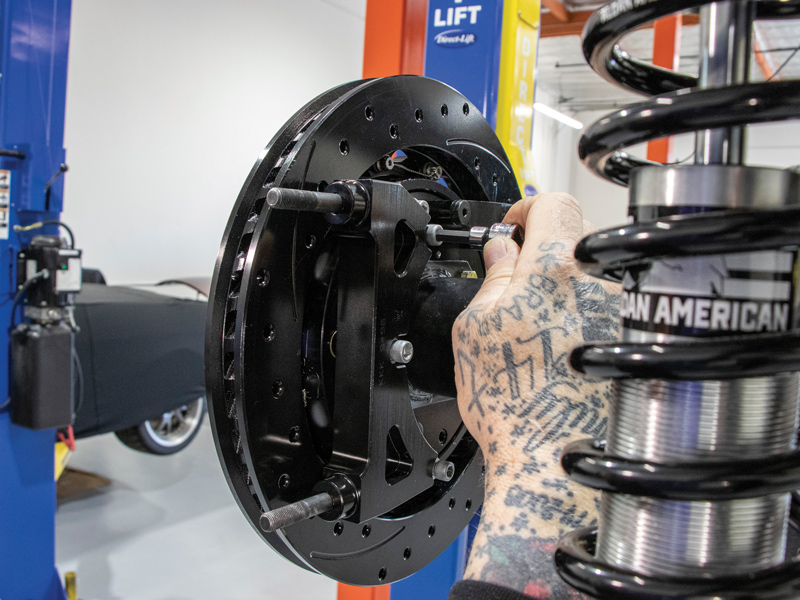
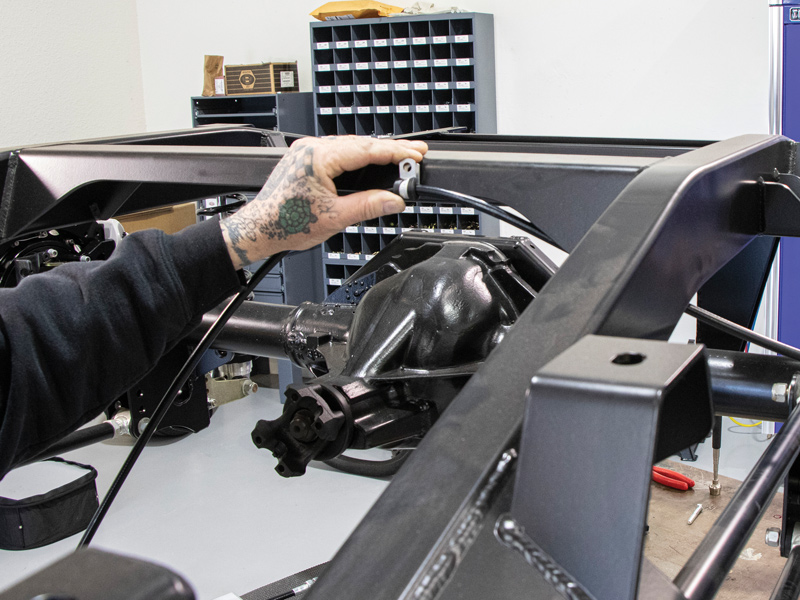
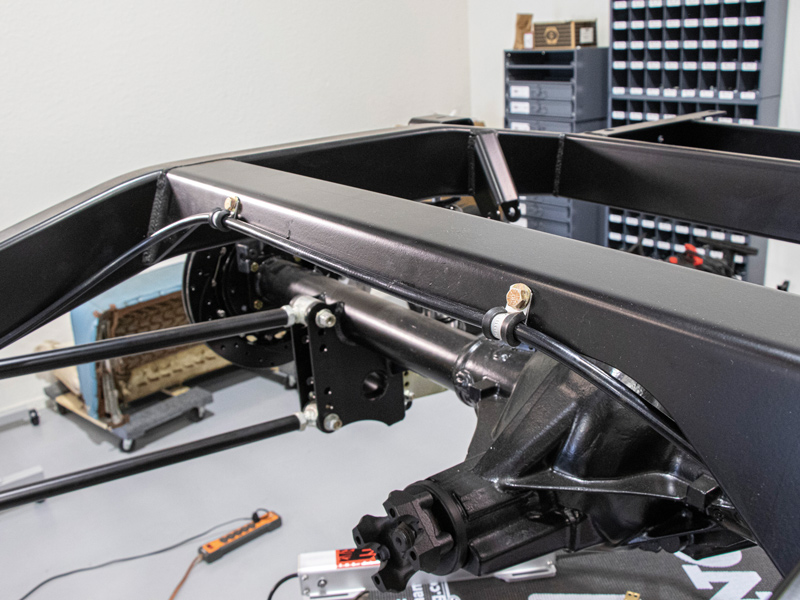
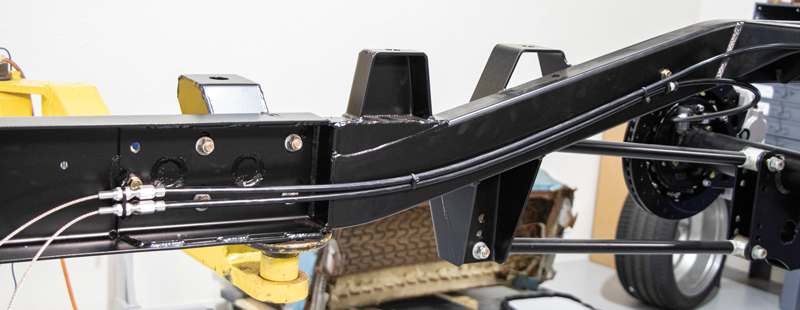
After getting our original 12-bolt overhauled by J&S Gear (also in the Apr. ’23 issue of CTP) we reinstalled it with our existing Watts Link rear suspension. While we were at it, we bolted on a new pair of single-adjustable coilovers from Aldan American to match the set we installed up front.

As for the rear brakes, Wilwood offers a few different kits that fit the 12-bolt rearend in our C10. The one we opted for was their Forged Narrow Superlite 4R Big Brake Rear Parking Brake Kit. These forged four-piston calipers clamp down on 12.88-inch, two-piece rotors and will offer all the stopping power we need and then some. Another neat feature is the integrated rear parking brake assembly that hides inside the aluminum rotor hat.

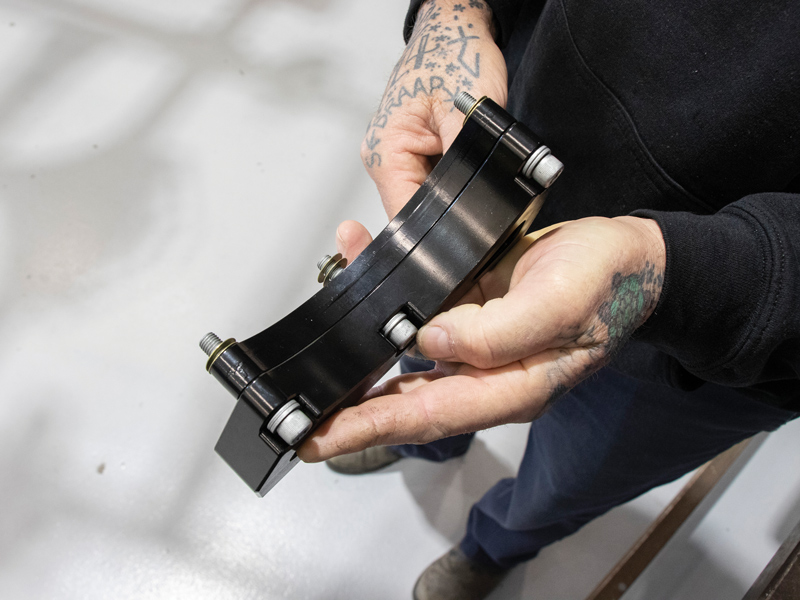
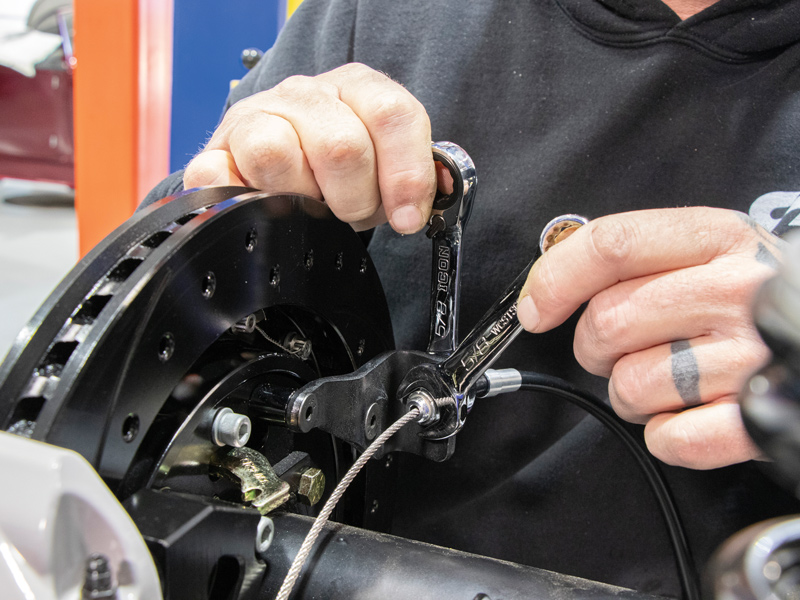
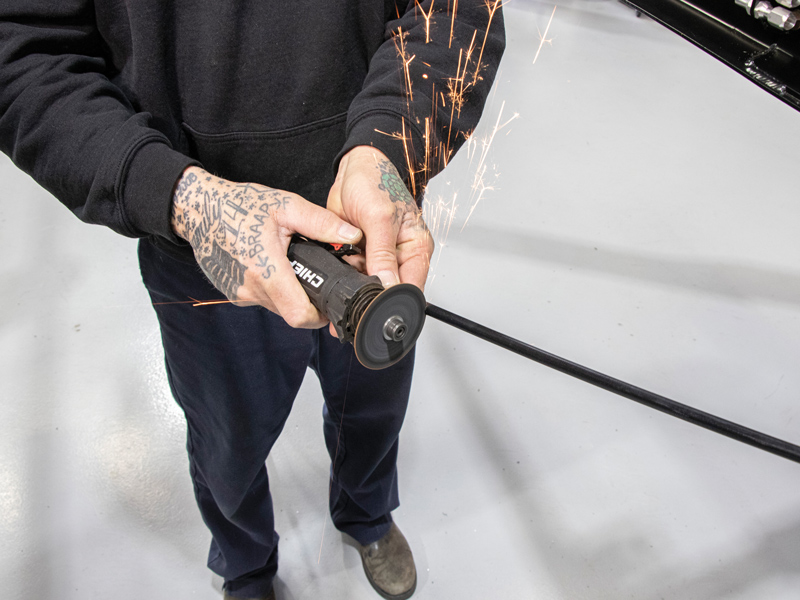
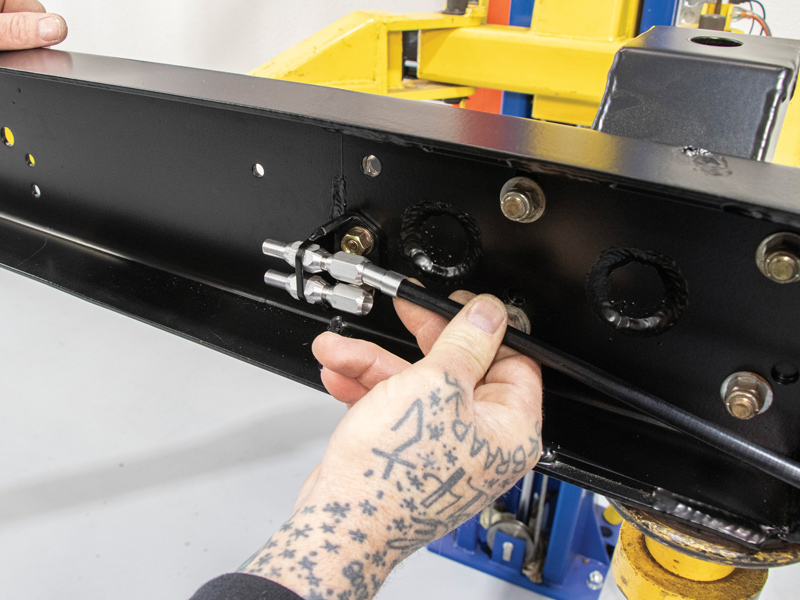
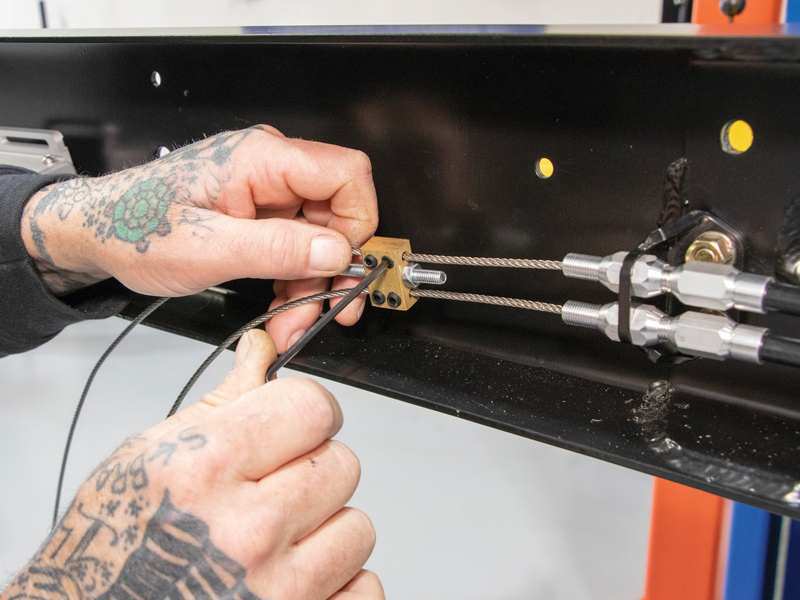
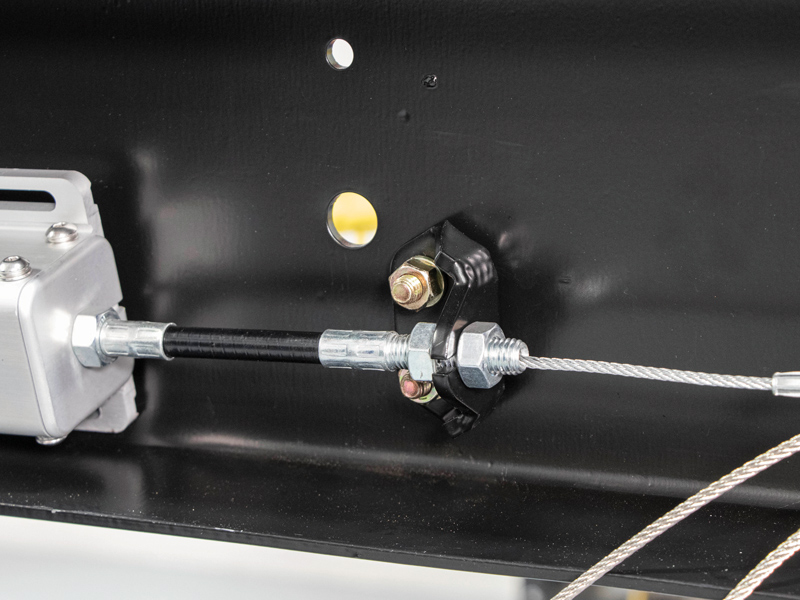
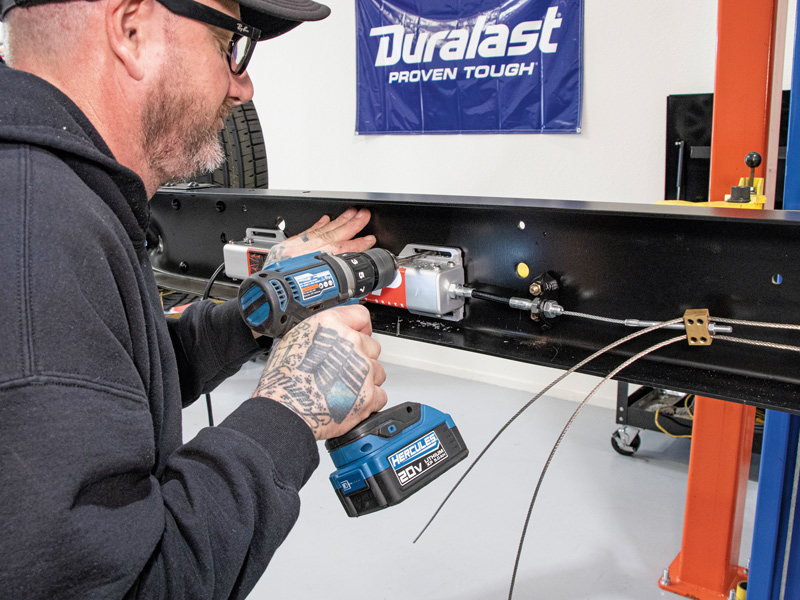
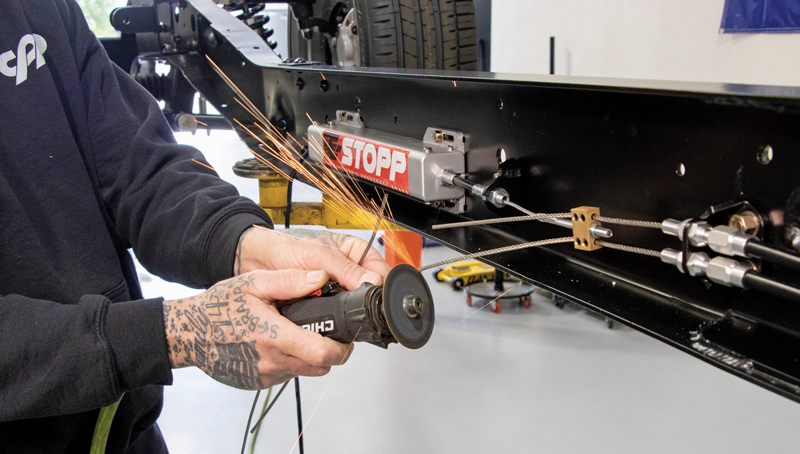
To actuate the rear parking brake, we will be using an E-Stopp unit. The E-Stopp can be mounted in various locations on the chassis or cab and is controlled by a single button. It can even act as an anti-theft deterrent if the button is hidden in a discreet location.

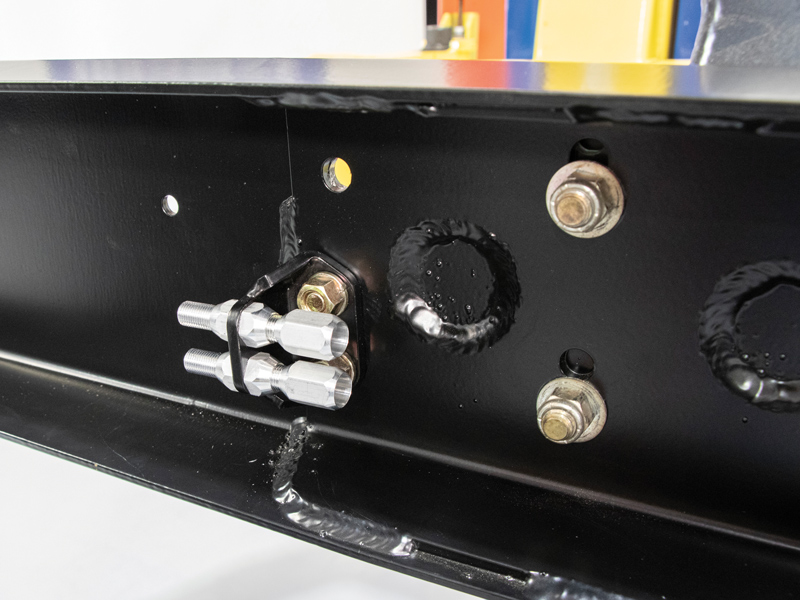
Then, just to make sure we had no surprises, we called up Classic Performance Products (CPP) and ordered up a few more parking brake components. They carry several universal brake cable kits and á la carte pieces to complete any parking brake install. One of our favorites for E-Stopp specifically is their mounting bracket. It is an all-in-one solution for installing an E-Stopp unit where the mounting location lacks structural rigidity (i.e. the thin sheetmetal of a cab or inside the trunk of a car).

A final note before we get to the installation, we installed these parts on our bare chassis on a fancy lift at the In The Garage Media Tech Center. We’ll be the first to admit we are a bit spoiled, but you won’t hear us complaining. While having the bed off and the chassis on a lift does afford us easier access for working, it is far from a requirement to install these parts. A pair of jackstands and a floor jack will do just fine.

new parts
1. On the menu for today’s install: Wilwood’s Forged Narrow Superlite 4R kit (with integral parking brake) and E-Stopp’s electronic activation kit, which we’ll be installing on our ’64 C10’s freshly rebuilt 12-bolt.
using impact to disassemble
2. First step will be to remove the CPP 30-spline axles from the 12-bolt we had overhauled by J&S Gear. Jason Scudellari began by removing the trick differential cover used by our Watts Link rear suspension.
Next, Scudellari used snap ring pliers to remove the large snap ring from the Eaton Detroit Truetrac differential.
3. Next, Scudellari used snap ring pliers to remove the large snap ring from the Eaton Detroit Truetrac differential.
Then he threaded in a bolt<br />
to remove the<br />
axle spacer retainer and a set of pliers<br />
to remove the<br />
 axle spacer.
Like any job, careful planning usually yields the best results, and it’s no different when it comes to planning a brake line system. Here, I’ve laid out all the various tees, fittings, valves, and other components for a previous job to ensure we had everything on hand before a single line was bent or flared.

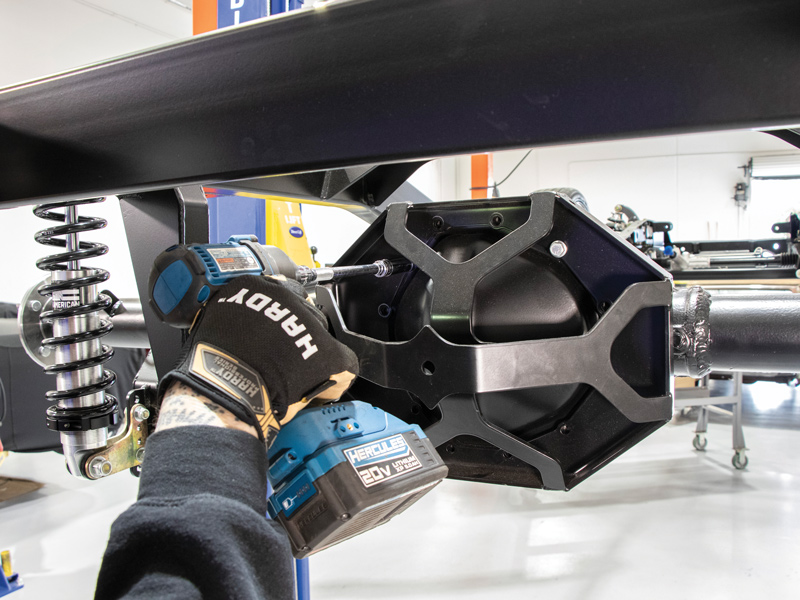
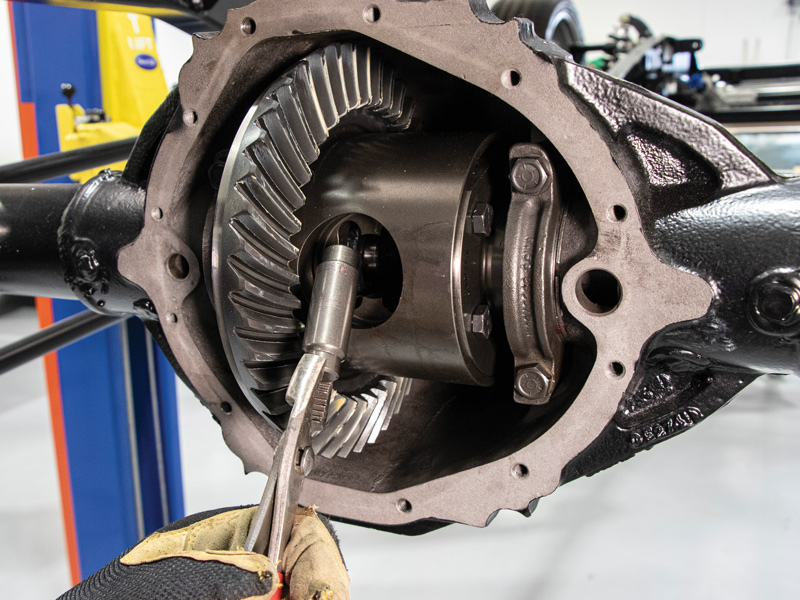
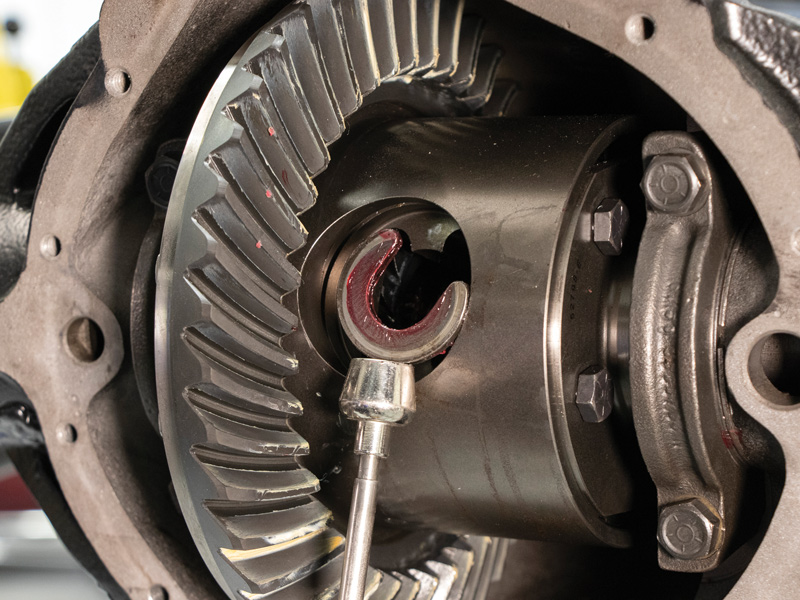
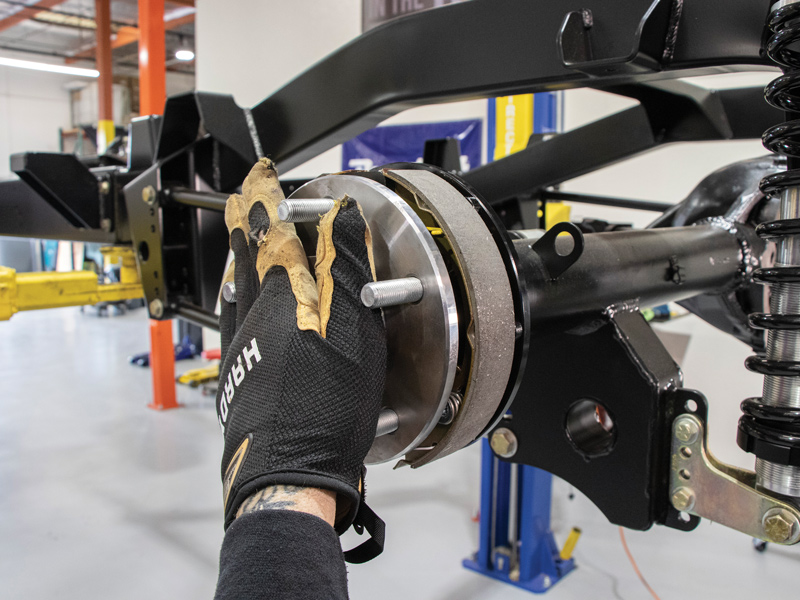
4-5. Then he threaded in a bolt to remove the axle spacer retainer and a set of pliers to remove the axle spacer.

The easiest way to get the C-clips out of the differential is with a magnet. There are two C-clips that need to be removed, one for each axle.
6. The easiest way to get the C-clips out of the differential is with a magnet. There are two C-clips that need to be removed, one for each axle.
With the C-clips out, the axles can be pulled easily. Obviously we are starting with a bare 12-bolt rearend so if you’ve still got your old drum brakes on your truck, you’d have to strip those off first.
7. With the C-clips out, the axles can be pulled easily. Obviously we are starting with a bare 12-bolt rearend so if you’ve still got your old drum brakes on your truck, you’d have to strip those off first.
The integrated parking brakes come fully assembled from Wilwood. All you have to do is install them on the axle housing using the supplied hardware.
8. The integrated parking brakes come fully assembled from Wilwood. All you have to do is install them on the axle housing using the supplied hardware
Once both parking brake assemblies are secured, both axles can be reinstalled in the housing and the differential can be put back together.
9. Once both parking brake assemblies are secured, both axles can be reinstalled in the housing and the differential can be put back together.
Scudellari sealed up the differential using RTV and the proper gasket then reinstalled the differential cover.
10. Scudellari sealed up the differential using RTV and the proper gasket then reinstalled the differential cover.
The rotors being a two-piece design meant the aluminum hat needed to be fastened to the steel rotor and secured with safety wire. This is a slightly tedious process but it’s an important one. We covered it in detail during the front brake install in the Apr. ’23 issue. Scudellari used a few lug nuts to hold the rotor in place before proceeding to install the caliper brackets.
11. The rotors being a two-piece design meant the aluminum hat needed to be fastened to the steel rotor and secured with safety wire. This is a slightly tedious process but it’s an important one. We covered it in detail during the front brake install in the Apr. ’23 issue. Scudellari used a few lug nuts to hold the rotor in place before proceeding to install the caliper brackets.
It is important to align the caliper on the rotor. Since each vehicle can have slight differences in axle length, the Wilwood kit is provided with a spacer for each side and an assortment of washers and shims. The photo shows how Scudellari set up the bracket for our 12-bolt rearend.
12. It is important to align the caliper on the rotor. Since each vehicle can have slight differences in axle length, the Wilwood kit is provided with a spacer for each side and an assortment of washers and shims. The photo shows how Scudellari set up the bracket for our 12-bolt rearend.
With the spacers and shims in place, he snugged up the bracket to the back side of the parking brake assembly.
13. With the spacers and shims in place, he snugged up the bracket to the back side of the parking brake assembly.
One shim per stud was added before mounting the caliper to the bracket.
14. One shim per stud was added before mounting the caliper to the bracket.
Scudellari prepared the caliper by removing the cross bolt and spacer to slide in the brake pads. Then he reinstalled the bolt and spacer to hold everything together.
15-16. Scudellari prepared the caliper by removing the cross bolt and spacer to slide in the brake pads. Then he reinstalled the bolt and spacer to hold everything together.
As it turned out, the spacer and shims Scudellari used were perfect for our application. If the caliper were to not line up perfectly on the rotor side to side or front to back, a different variation of shims or spacers would be needed.
17. As it turned out, the spacer and shims Scudellari used were perfect for our application. If the caliper were to not line up perfectly on the rotor side to side or front to back, a different variation of shims or spacers would be needed.
After installing the other brake rotor and caliper, he moved onto the parking brake cables. First step was securing one end of the supplied brake cable housing to the rear of the parking brake assembly.
18. After installing the other brake rotor and caliper, he moved onto the parking brake cables. First step was securing one end of the supplied brake cable housing to the rear of the parking brake assembly.
Then Scudellari fed the end of the cable into the brake lever clevis and attached it to the lever protruding from the rear of the parking brake assembly.
19-20. Then Scudellari fed the end of the cable into the brake lever clevis and attached it to the lever protruding from the rear of the parking brake assembly.
The decision was made to mount the E-Stopp inside the passenger side frame so Scudellari routed the parking brake housing up and over the rear axle. He made sure the cable housing had enough slack to avoid binding during suspension travel without rubbing or catching on anything else.
21. The decision was made to mount the E-Stopp inside the passenger side frame so Scudellari routed the parking brake housing up and over the rear axle. He made sure the cable housing had enough slack to avoid binding during suspension travel without rubbing or catching on anything else.
To secure the cable housings, he drilled two holes in the crossmember and used a couple of Adel Clamps with bolts and nuts.
22. To secure the cable housings, he drilled two holes in the crossmember and used a couple of Adel Clamps with bolts and nuts.
 Next, he bolted the CPP dual cable adjuster bracket to the frame using one existing hole, then drilled a new hole for the second bolt. Then Scudellari installed the cable adjuster bulkhead fittings to the bracket.
 Next, he bolted the CPP dual cable adjuster bracket to the frame using one existing hole, then drilled a new hole for the second bolt. Then Scudellari installed the cable adjuster bulkhead fittings to the bracket.
23-24. Next, he bolted the CPP dual cable adjuster bracket to the frame using one existing hole, then drilled a new hole for the second bolt. Then Scudellari installed the cable adjuster bulkhead fittings to the bracket.
hands using grinder to cut metal
He then needed to shorten the cable housing to remove the excess slack. After removing the cable from the housing, he measured and marked the housing then used a cutoff wheel to remove the extra length. He reinstalled the non-crimped ferrule fitting on the end of the housing and fed it into the cable adjuster bulkhead.
25-26. He then needed to shorten the cable housing to remove the excess slack. After removing the cable from the housing, he measured and marked the housing then used a cutoff wheel to remove the extra length. He reinstalled the non-crimped ferrule fitting on the end of the housing and fed it into the cable adjuster bulkhead.
With one side done, Scudellari proceeded to route the other cable housing next to the first. Then he fed the parking brake cables back into their respective housings.
27. With one side done, Scudellari proceeded to route the other cable housing next to the first. Then he fed the parking brake cables back into their respective housings.
Next he fed both cables into the dual cable junction block, pulled them both even, and tightened the setscrews.
28. Next he fed both cables into the dual cable junction block, pulled them both even, and tightened the setscrews.
The last stop before mounting the E-Stopp was to install the single cable adjuster bracket from CPP. Scudellari made sure to keep both brackets lined up with the E-Stopp to ensure smooth operation.
29. The last stop before mounting the E-Stopp was to install the single cable adjuster bracket from CPP. Scudellari made sure to keep both brackets lined up with the E-Stopp to ensure smooth operation.
Then he proceeded to drill four holes and mount the E-Stopp to the framerail using 1/4-20 hardware.
30-31. Then he proceeded to drill four holes and mount the E-Stopp to the framerail using 1/4-20 hardware.
Finally, after all the cables were adjusted, Scudellari trimmed the excess off the two parking brake cables.
32. Finally, after all the cables were adjusted, Scudellari trimmed the excess off the two parking brake cables.
Obviously there are a few things we didn’t get to, including wiring, mounting the controller box and button for the E-Stopp, and making new brake hardlines. We’ll have to get to all that once we have a cab back on our chassis and a master cylinder to route brake lines to. You might not see that in the very next issue, but we’ll get there eventually!
33. Obviously there are a few things we didn’t get to, including wiring, mounting the controller box and button for the E-Stopp, and making new brake hardlines. We’ll have to get to all that once we have a cab back on our chassis and a master cylinder to route brake lines to. You might not see that in the very next issue, but we’ll get there eventually!
Tech Center - Duralastparts.com / Frontiersupplies.com
 SOURCES
Aldan American
(310) 834-7478
aldanamerican.com
Classic Performance Products
(800) 760-7438
classicperform.com
E-Stopp
(888) 688-6348
estopp.com
J&S Gear
(714) 841-4545
jandsgears.com
Wilwood
(805) 388-1188
wilwood.com