CTP TECH
InTheGarageMedia.com
1946 Chevy Truck, black patina, pre-restoration parked by a garage
1. Fresh from the barn where it was found, this 1946 Chevy Art Deco–Series truck was a perfect candidate to bring back to life. An updated stance, improved handling, and dependable driveline will make it a pleasure to drive, complemented by its natural patina telling a great story of its survival from the past decades of use and abuse.
Art Deco Revival
Getting a 1941-46 Chevy Truck Back on the Road
BY Chuck Vranas
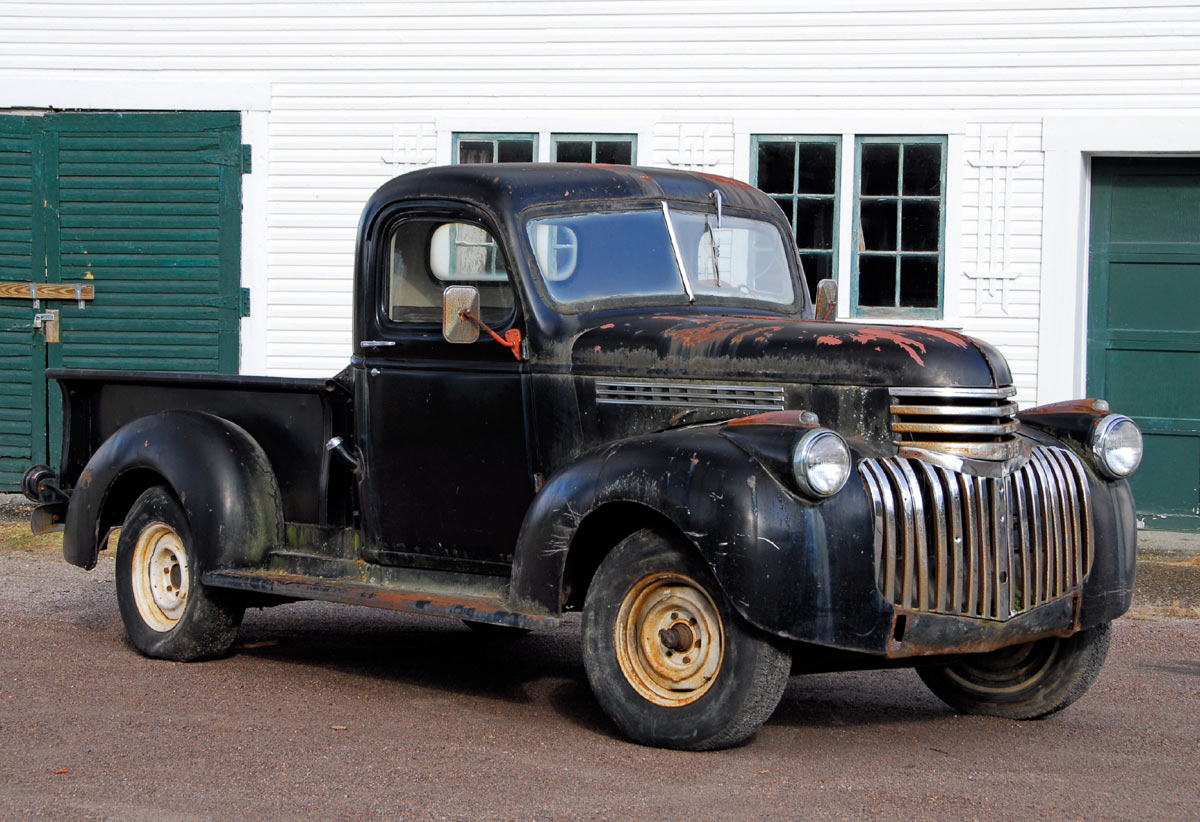
Images BY THE AUTHOR
T

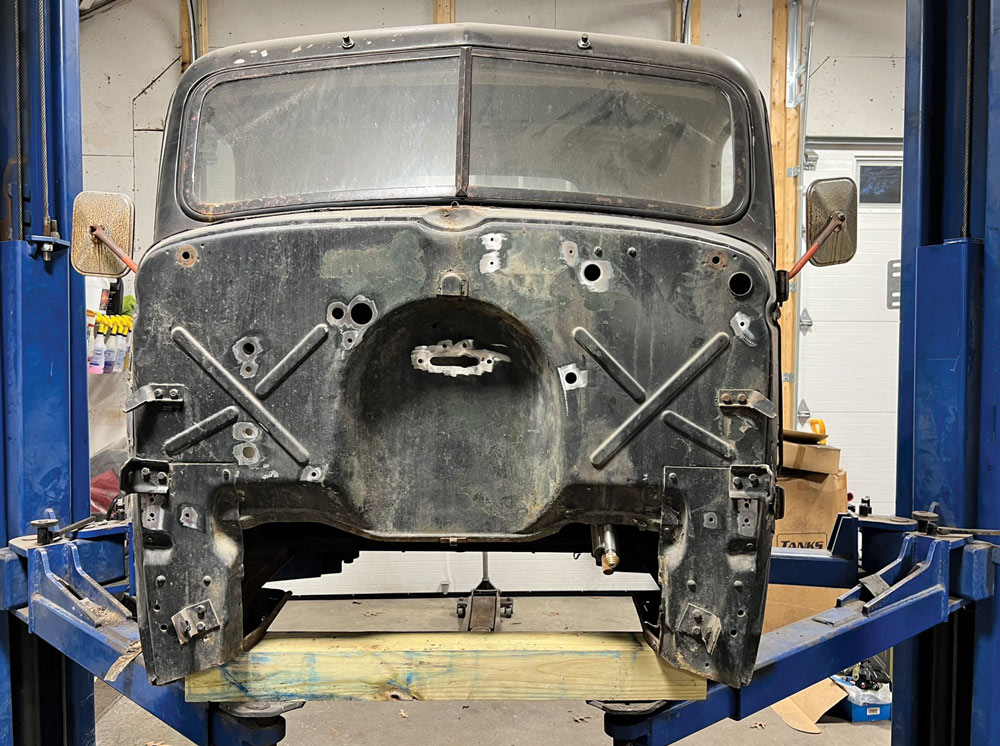
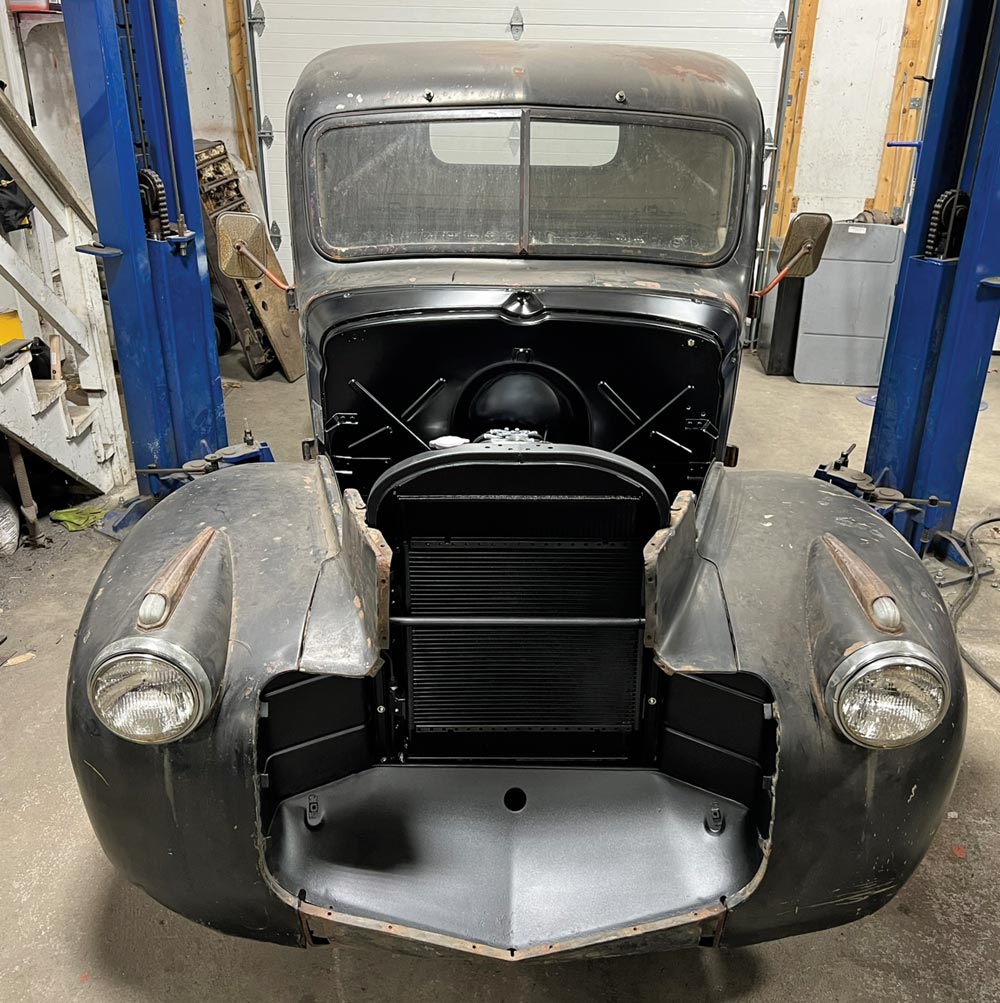
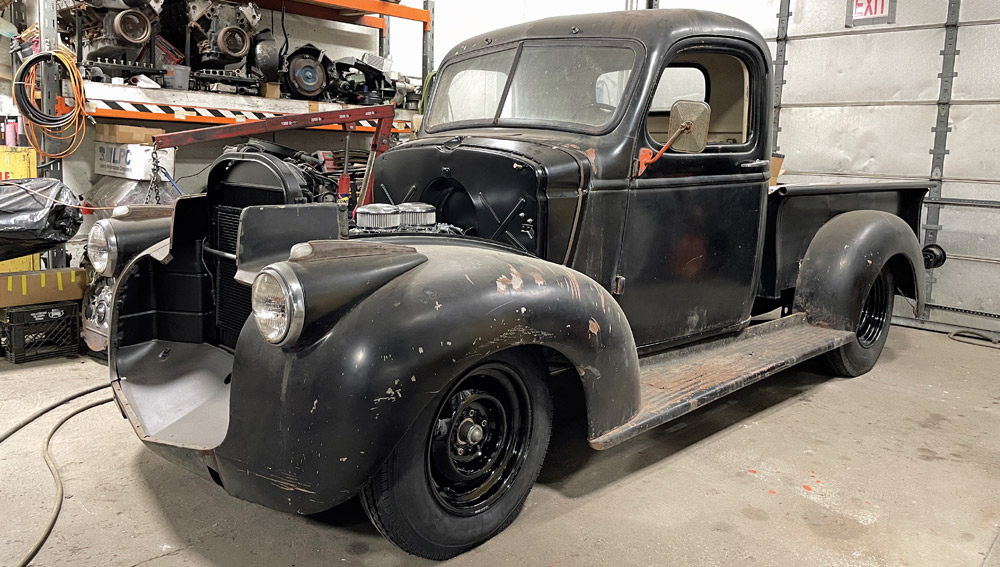
here’s nothing better than walking into an old barn to find a dust-covered truck sitting in a back corner waiting its turn to be brought back to life. Regardless of whether it’s been sitting in a farmer’s field, back lot of a salvage yard, or even in a barn, there’s plenty of work ahead should you decide to take on reviving it back to street duty. Choosing to retain its well-earned patina gives it a winning hand when it comes to the cool factor. Nothing looks more bitchin than a well-balanced truck showcasing its history for everyone to appreciate once it hits the scene. The 1946 Chevy Art Deco–Series truck in our story has been a long-term build evolving over the years as an affordable hauler with a focus on stance, improved handling, and dependability for the next chapter.

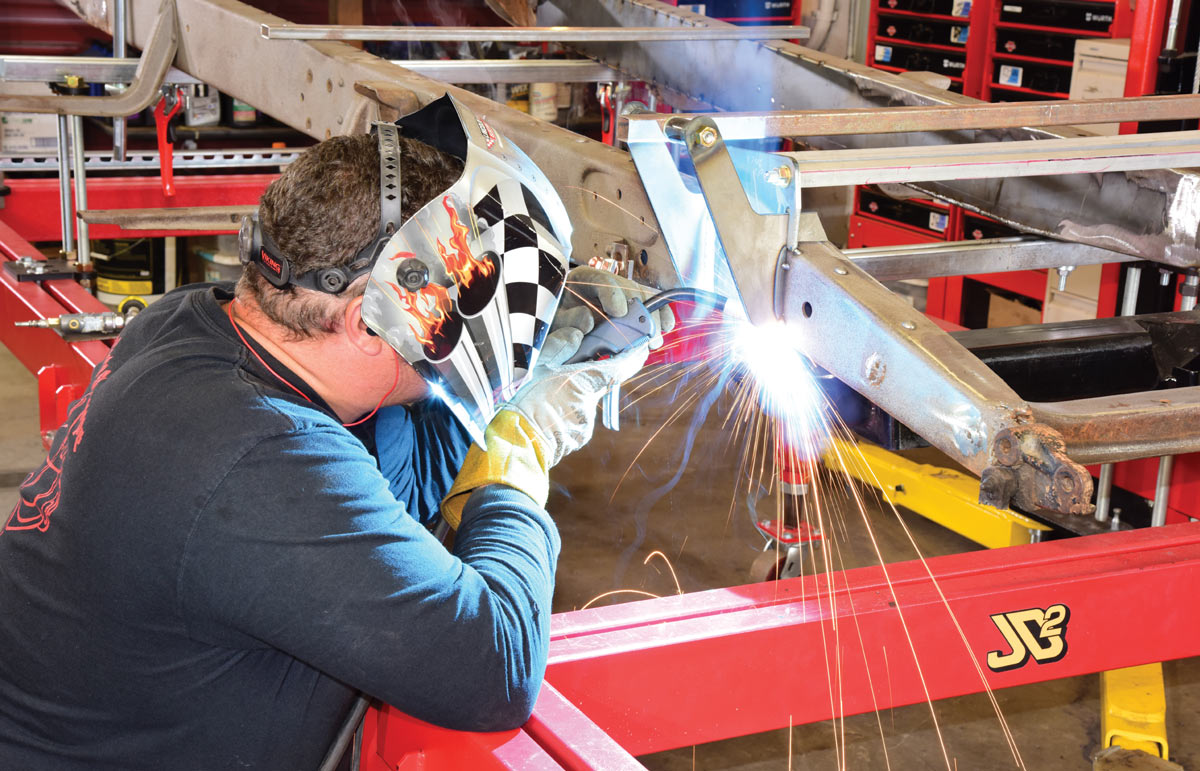
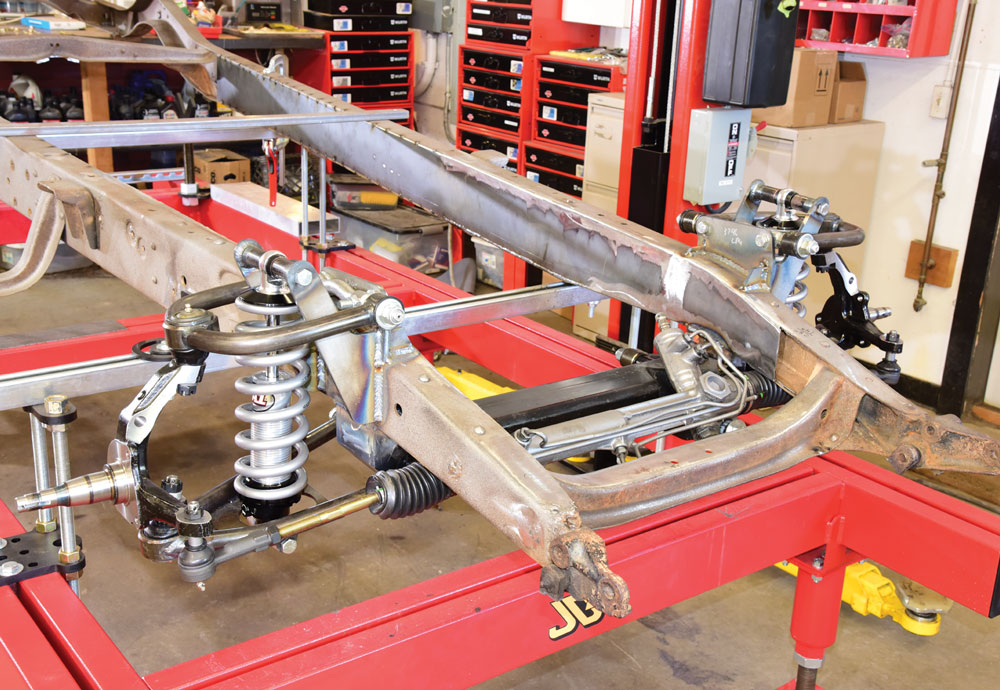
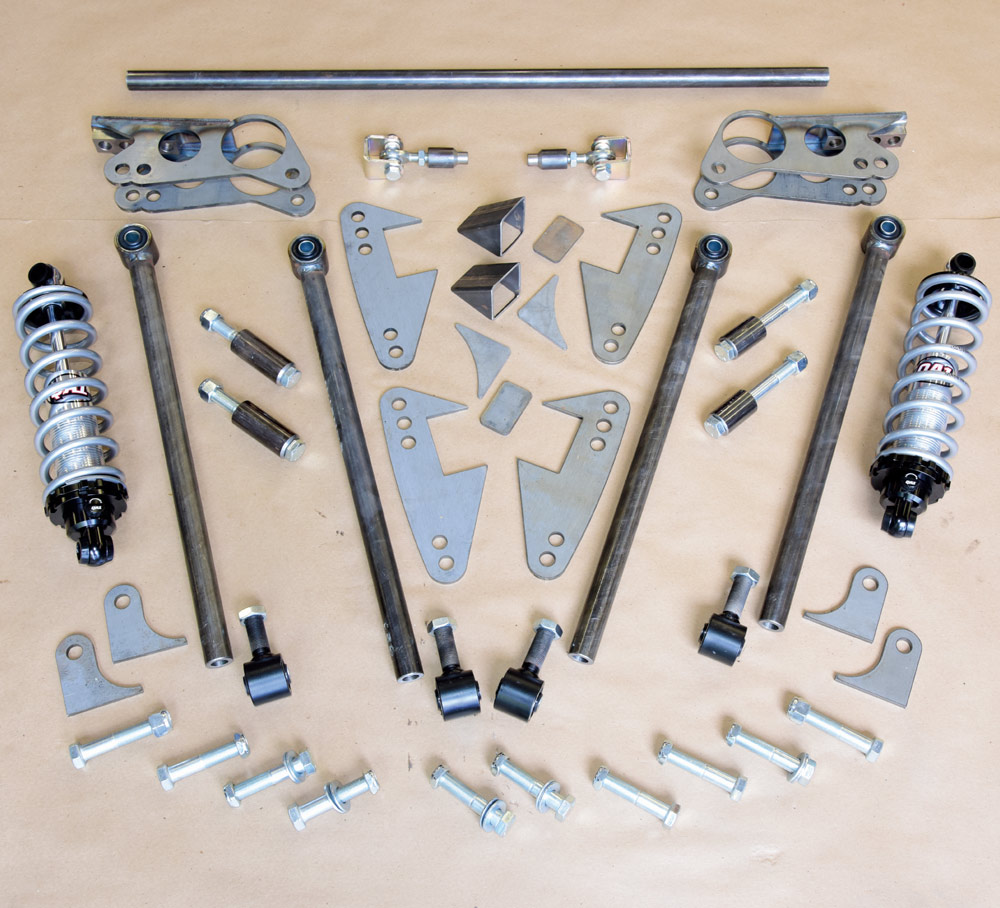
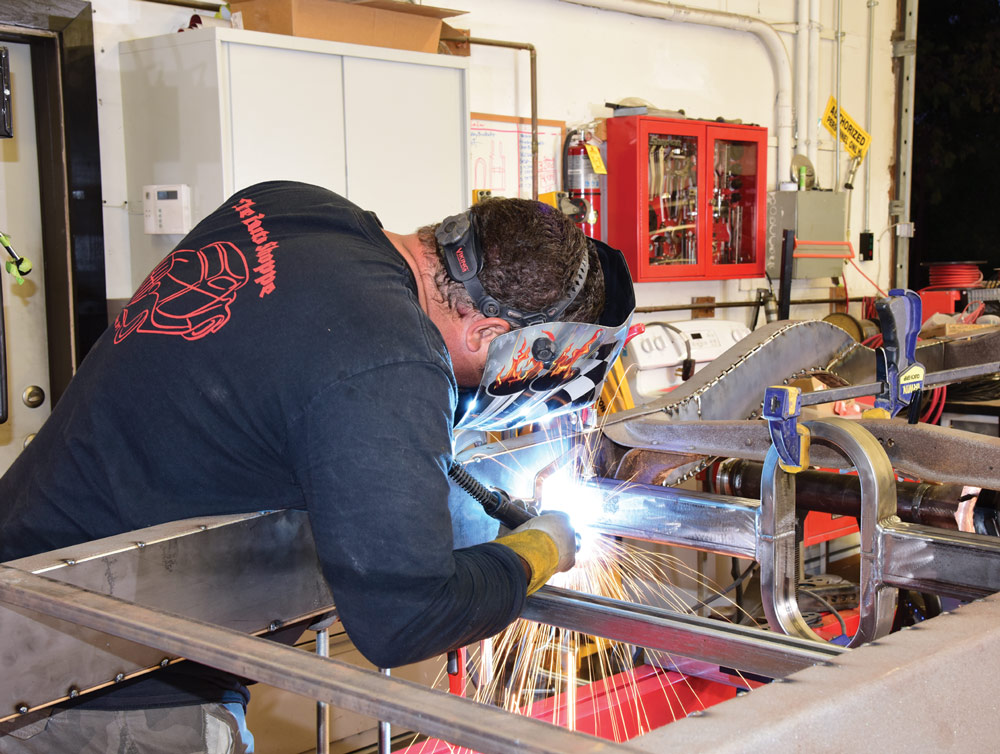
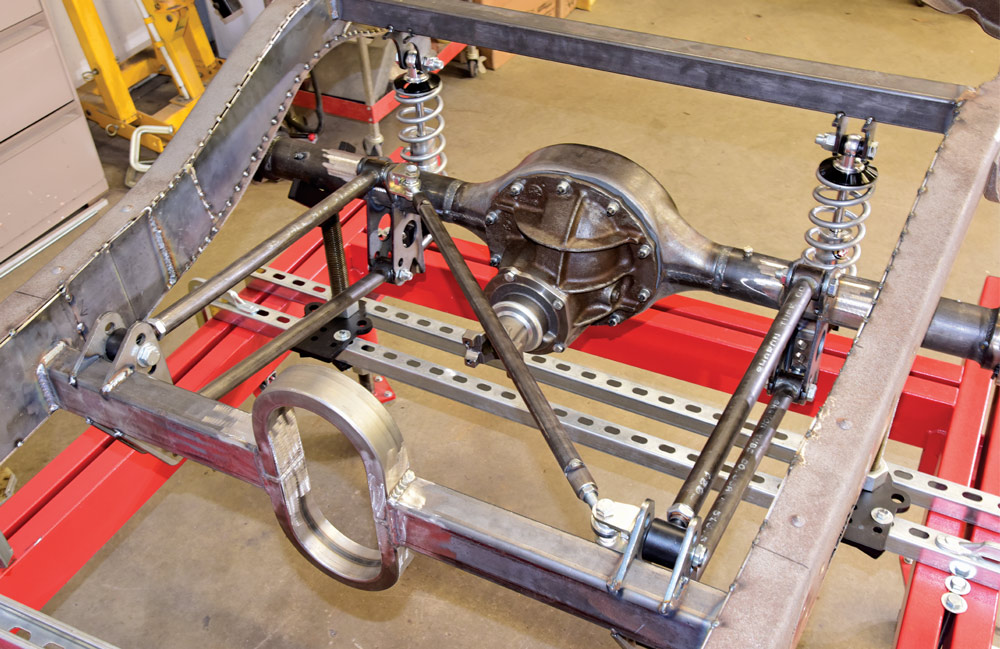
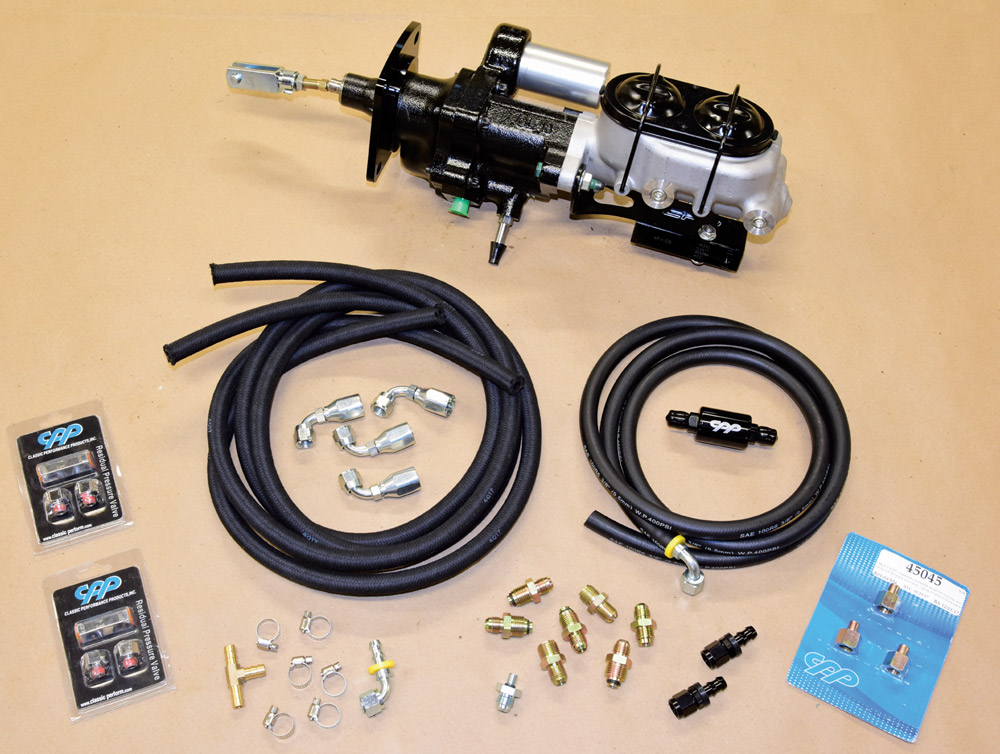
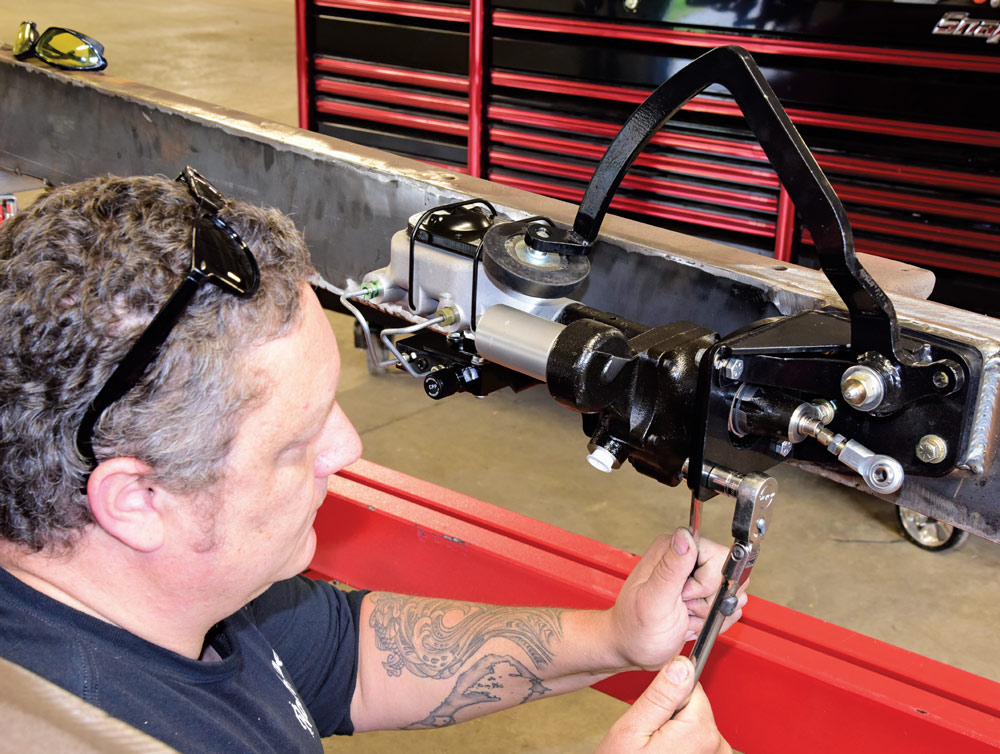
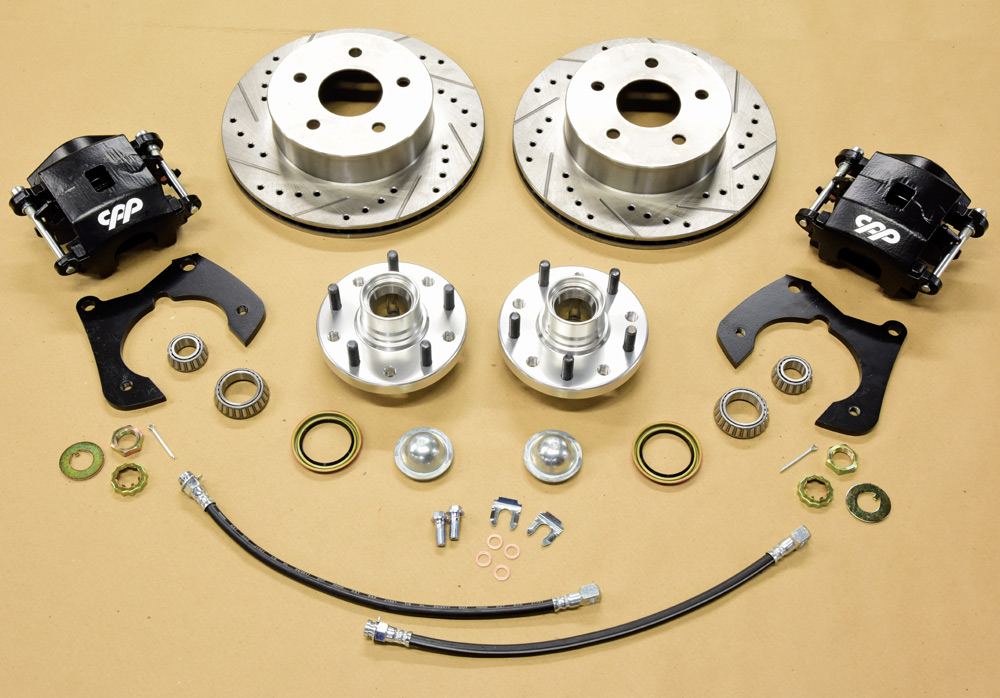
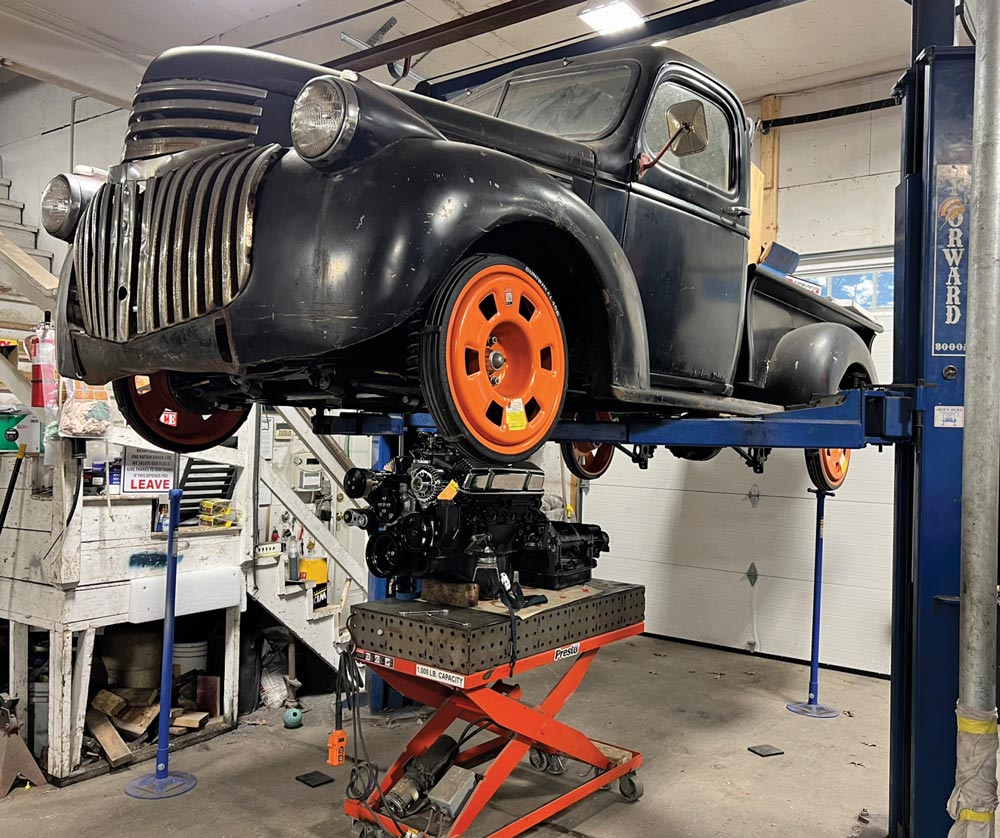
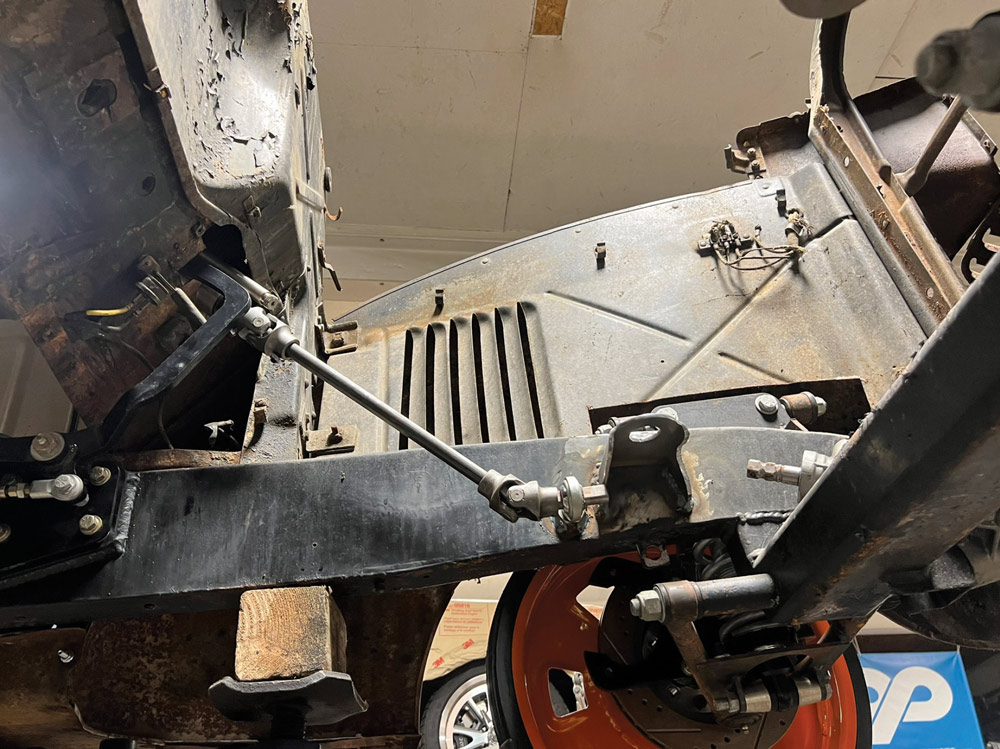
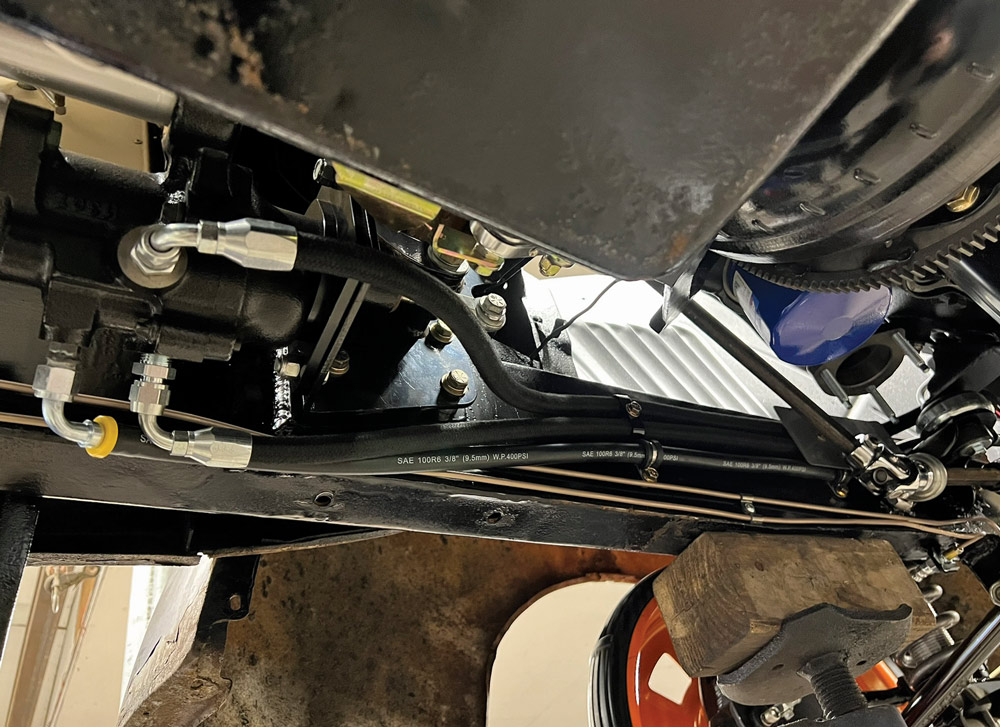
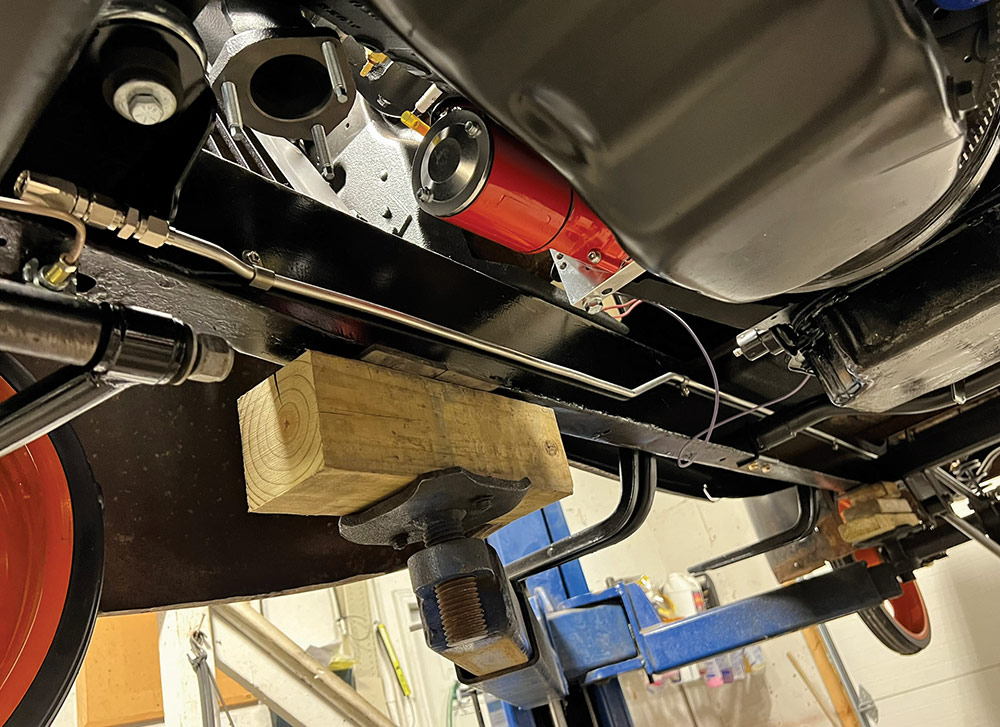
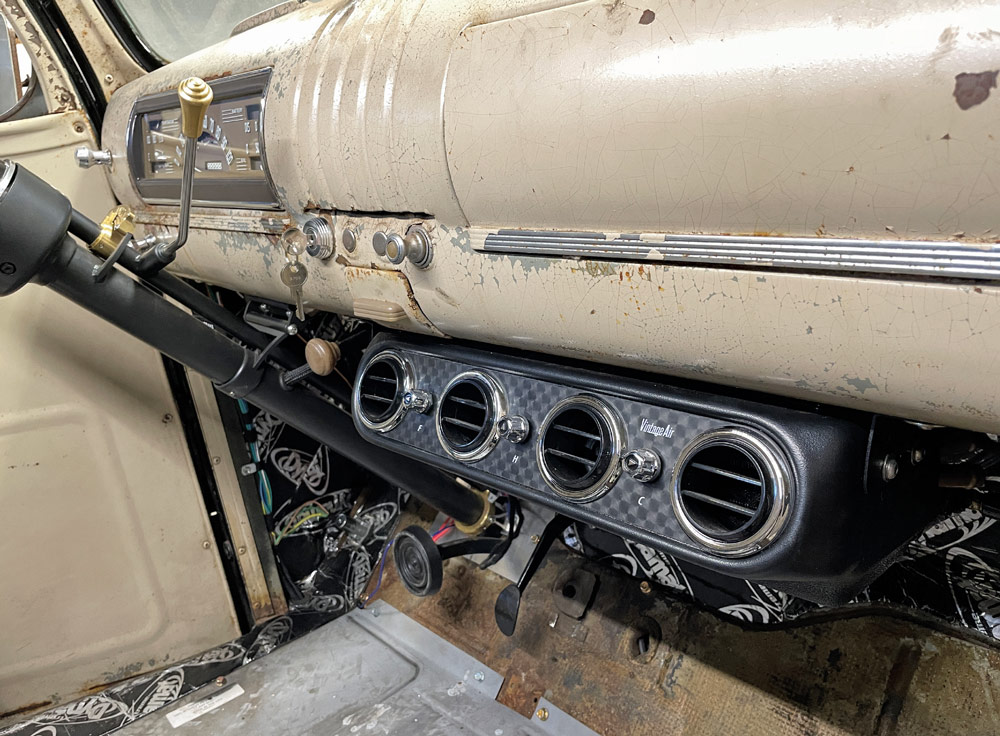
When taking on any build, it’s a great idea to have a plan to follow, laying out the steps needed in order to reach your goal. In this case, starting with a well-preserved truck was a plus, eliminating the needs for any structural or rust repairs. From ground zero, we wanted to focus on updated handling and braking, so it made sense to start with the chassis. Once separated from the cab and bed, it was stripped of all original factory parts, including the driveline, brakes, and suspension, then blasted clean. Inspection proved it was straight and rock solid, making it a perfect base to use. The team at Rothspeed in Milton, Vermont, got busy by first boxing the entire frame and following with updated suspension components (1937-1946 Chevy Mustang II with universal four-link), all anchored by QA1 adjustable coilover shocks. Updating the old factory binders to four-wheel disc brakes was a snap thanks to Classic Performance Products (CPP) 11.75-inch slotted and cross-drilled rotors, forged aluminum hubs, and Big-Bore calipers combined with their exclusive HydraStop hydraulic brake-assist system.

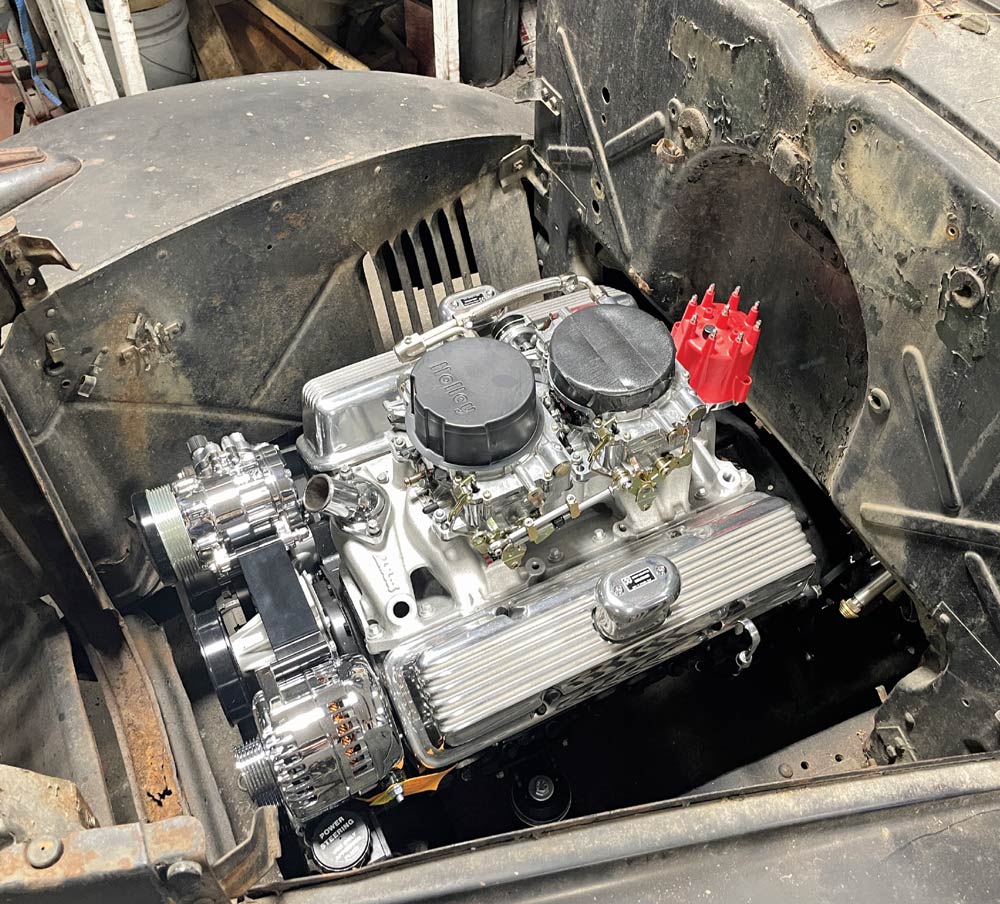
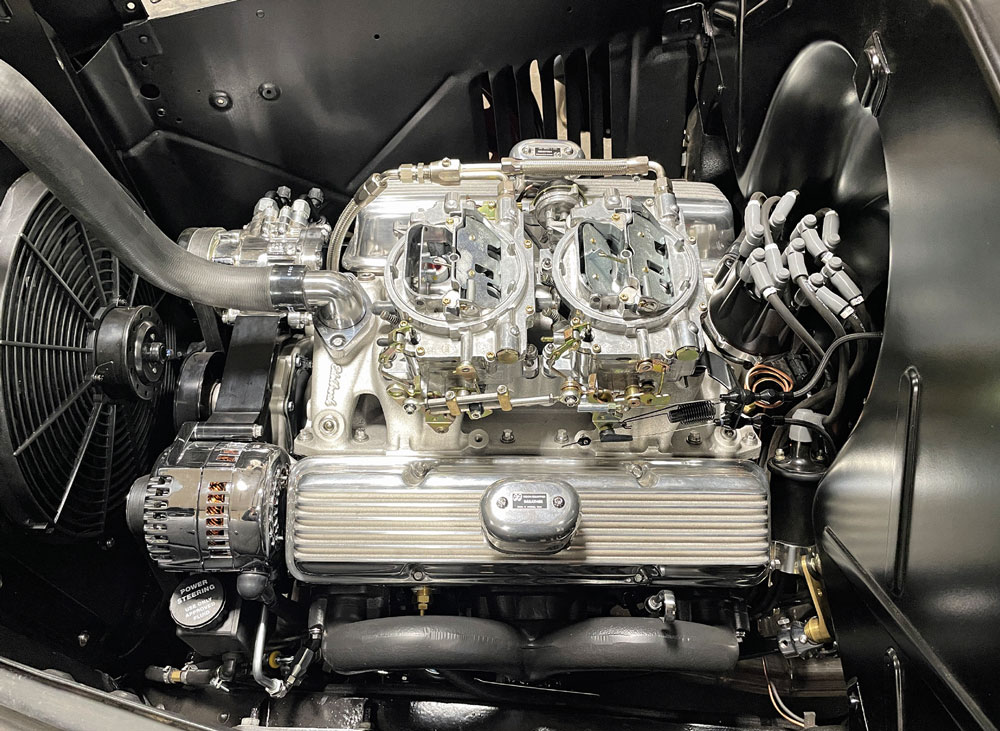
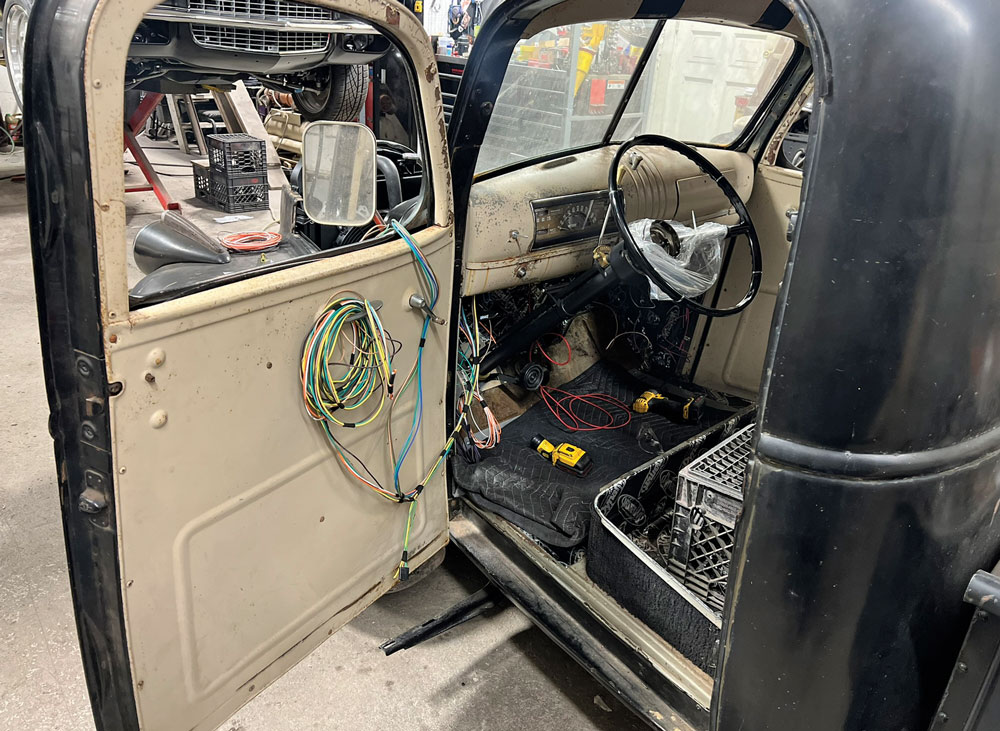
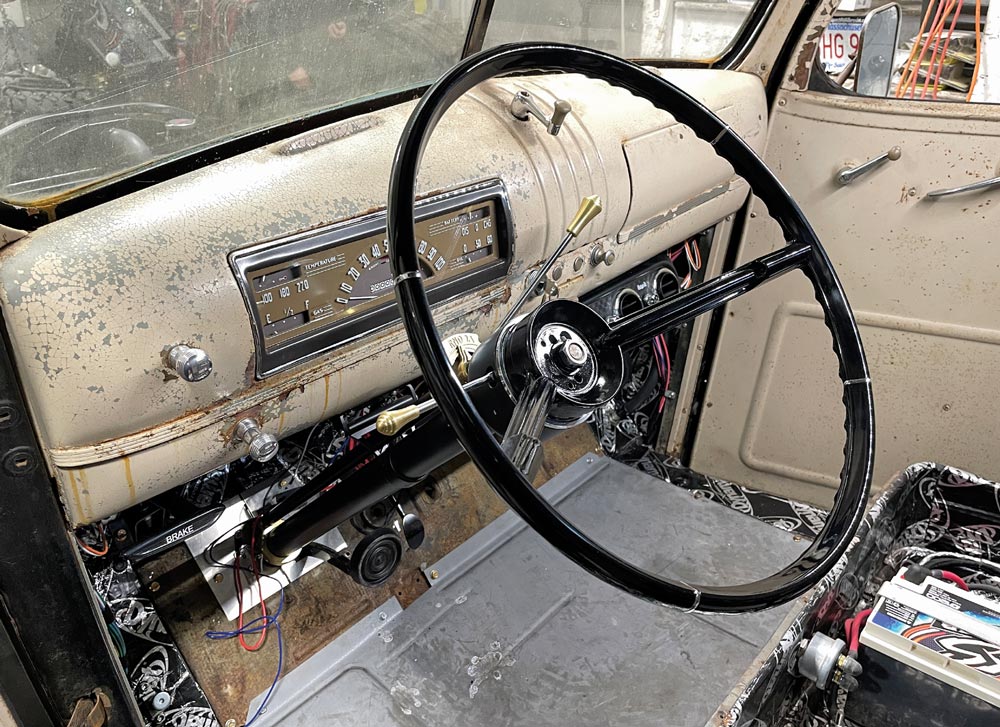
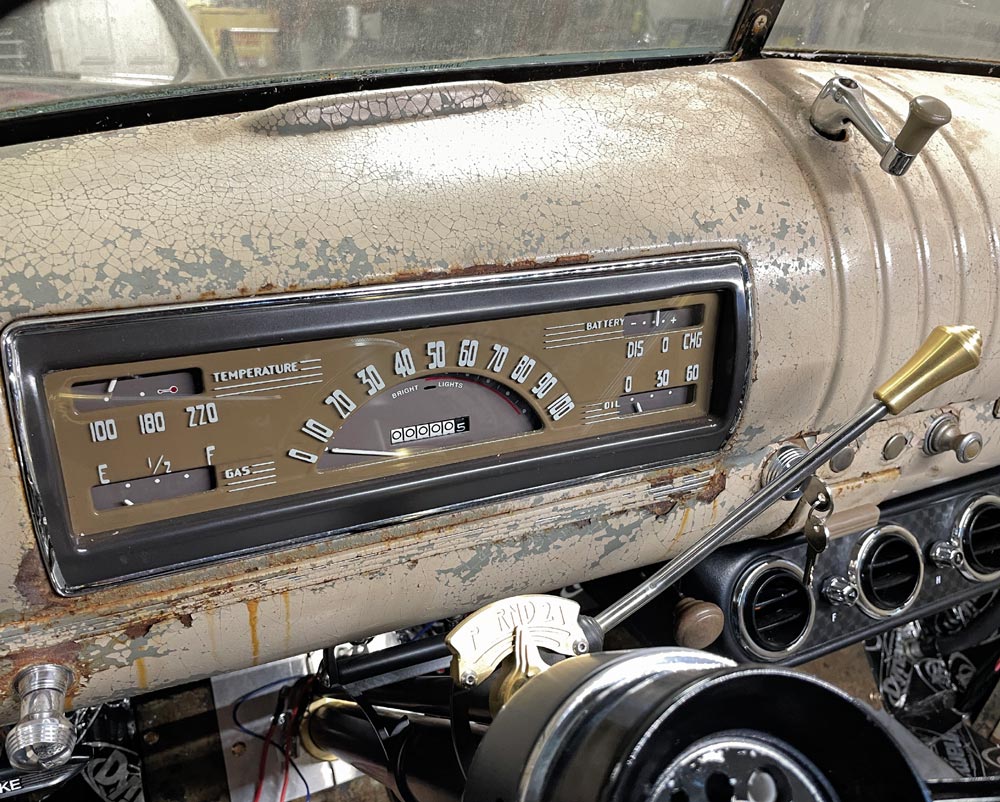
When it came time to address the driveline it was imperative to consider performance and dependability, since the truck would be seeing plenty of miles once completed. A Chevrolet Performance 350ci crate V-8 was treated to several performance upgrades, including an Edelbrock dual-quad system along with an MSD Pro Billet ignition, Vintage Air Front Runner accessory drive system, and Flow Tech rams horn exhaust manifolds, all available from Speedway Motors. Dyno’d and tuned by Green Mountain Gear-Heads in Williston, Vermont, it was delivered complete with a freshly rebuilt GM TH400 trans to Procision Industries in Taunton, Massachusetts, for installation. Shop owner Pat O’Brien handled the rest of the buildup, incorporating plenty of parts from Chevs of the 40’s and Speedway Motors, as well as paint, detailing, plumbing, exhaust, wiring, and fabrication in preparing the truck once again for street duty. Let’s follow along with a timeline showcasing the build as we lead up to its completion.

Welding front suspension brackets on 1946 Chevy truck frame
2. Once the original suspension was stripped, the frame was blasted clean, inspected, and fully boxed by Scott Roth of Rothspeed. Roth followed with a precision installation of the new front crossmember and all related brackets.
Assembled front suspension on 1946 Chevy truck chassis
3. With all MIG welding completed, the included components were bolted in place. The completed new IFS not only looks great but will deliver flawless handling and far-improved performance over the original factory setup.
Rear suspension parts kit for 1946 Chevy truck, four-link setup
4. To bring an equal amount of performance out back for laying down the power, a universal four-link with QA1 adjustable billet coilover shocks (pictured) also includes an upper rear crossmember and driveshaft loop crossmember.
Welding rear suspension brackets on 1946 Chevy truck frame
5. With everything prepped for the installation, Roth measured, cut, and fit the crossmembers in place. He then followed with a MIG welder to properly anchor them to the frame and continued onto adding additional brackets and finally assembly of the kit.
Rear suspension assembly installed on 1946 Chevy truck frame
6. Here you can see the fully installed universal four-link along with new QA1 adjustable billet coilover shocks and Speedway Motors 9-inch rear featuring a Currie Enterprises Hot Rod Rear Axle Housing with 31-spline axles and Speedway Posi third member.
Power brake booster kit for 1946 Chevy truck modernization
7. When it’s time to up the ante in the braking department, nothing speaks more volume than Classic Performance Products’ (CPP) HydraStop hydraulic brake-assist systems available for a myriad of applications. The bolt-in system comes with everything needed to complete the installation to upgrade manual or vacuum-assisted brakes with a powerful and compact hydraulic assist unit.
Installing brake booster assembly on 1946 Chevy truck frame
8. Roth fabricated a custom mounting plate for our specific inner boxed framerail application and continued on with mounting the unit in place using the supplied hardware.
Disc brake conversion kit for 1946 Chevy truck upgrade
9. To add even more punch for stopping, CPP offers a multitude of choices for upgrading to four-wheel disc brakes. Our selected kit incorporated everything needed to take on the conversion for adapting to our Mustang II–style spindles, including 11.75-inch slotted and cross-drilled rotors, forged aluminum hubs, Big-Bore calipers and all mounting hardware, hoses, and bearings to complete the installation (front kit pictured).
Installing Brake Calipers 1946 Chevy
10. The freshly powdercoated black calipers came with the pads already loaded into the assemblies, making installation a snap. The completed front and rear disc brakes look great and will add plenty of newfound stopping power to the truck.
1946 Chevy outside on lift
11. With the suspension and brake updates completed, the team at Rothspeed carefully remounted the cab to the chassis to prepare it for the next steps, including replacing the windshield frame and wiper system, glass, and dash components, all with parts from Chevs of the 40’s.
1946 Chevy body panels reinstalled, inside on lift
12. With the truck now a roller, in the care of Pat O’Brien at Procision Industries, it was time to mock up the engine and transmission mounts for the driveline.
1946 Chevy V8 installed in engine bay
13. With the factory driveline removed, you can see the initial install of the Chevrolet Performance 350ci small-block into the engine bay to check for fitment as well as establishing the engine mounts and cooling needs. As pictured, the engine features an Edelbrock dual quad setup and MSD Pro Billet ignition from Speedway Motors, Mooneyes valve covers, and Vintage Air Front Runner accessory drive.
rear suspension view 1946 Chevy
14. With the engine back out, O’Brien fabricated the steering system, linking the Ididit 40-Style straight steering column to the power rack-and-pinion using forged steering joints and shafts from Speedway Motors.
1946 Chevy Cab isolated ready for work
1946 Chevy Cab windows covered, prep for paint
1946 Chevy Firewall painted black
15-17. In tidying up the engine bay, the frontend sheetmetal was removed to begin the task of weld-filling a myriad of unneeded holes on the firewall with sheetmetal to give it fresh look. The area was then sprayed with epoxy primer and finished with SEM Hot Rod Black.
1946 Chevy V8 reinstalled after paint job
18. With the chassis now finished in matching satin black, O’Brien began reassembly of the front suspension in preparation for the install of the frontend sheetmetal.
1946 Chevy front fenders and headlights installed
19. Here you can see the level of detail in the grille opening and inner splash pan as well as the radiator core support, all cleaned, prepped, and treated to a mild-textured satin black finish.
1946 Chevy V8 with carburator filters removed
20. With the engine bay in final assembly, it’s easy to see the perfect fitment of all the components, including the ignition access to the factory firewall, exhaust, and cooling system, all complemented by the inner fenders treated to a matching mild textured finish.
1946 Chevy undercarriage view of fluid lines
1946 Chevy hard brake lines installed
21-22. In keeping everything tidy underneath the truck, you can see the cleanly routed plumbing for the CPP HydraStop hydraulic brake-assist system making its way forward to the power rack-and-pinion as well as the NiCopp brake lines and final steering layout.
1946 Chevy Undercarriage view of gas tank and rear end
23. Out back, a 16-gallon alloy-coated, 14-gauge steel gas tank from Chevs of the 40’s was used, arriving complete with mounting straps, making installation a snap to replace the factory unit, which was mounted inside the cab. You can also check out the universal four-link with Z-bar, QA1 coilover shocks, CPP disc brakes, and lines.
1946 Chevy view of exhaust setup from below
24. The exhaust system starts with a pair of Flowtech rams horn manifolds and reducers linked to 2-1/2-inch 409 stainless pipes with a custom-crafted X-pipe by Procision deftly matched to Flowmaster FlowFX-Series 409 stainless mufflers, all from Speedway Motors.
1946 Chevy working on bottom of transmission
25. It’s all in the details under the truck with O’Brien wrapping things up by installing a chrome TH400 transmission pan and dust cover, both from Mr. Gasket.
1946 Chevy wiring process interior
26. To bring the build to life, an American Autowire Highway 15 Plus, universal wiring kit was selected featuring 15 circuits, color-coded wiring harness, switches, connectors, and full color step-by-step installation instructions.
1946 Chevy new steering wheel
27. Inside, you’ll find an Ididit 40-Style straight column adding nostalgic style, especially when paired to a new reproduction OER 1964 Impala steering wheel from Speedway Motors accented by SO-CAL Speed Shop Art Deco-Series ignition, headlight, and wiper switches.
1946 Chevy brand new gauge cluster installed
28. With the original tattered gauge panel having served the truck well for over 75 years, it was time to freshen up the dash. Chevs of the 40’s offers rebuilt factory gauge clusters for monitoring all the engine’s vitals. Ours was rebuilt for 12V V-8 use and ready to go right out of the box combined with a new chrome bezel to complete the look.
1946 Chevy Vintage air system installed
29. Nothing says comfort for the long haul better than an efficient air conditioning system. A perfect match to the Vintage Air Front Runner accessory drive was their classic Heritage-Series underdash evaporator system. Our unit features heating and cooling as well as a classic black anodized engine-turned faceplate.
1946 Chevy battery housing with dynamat lined
30. Selecting a proper area for your battery as well as wiring and ignition is a must. Seeing we installed a rear-mounted gas tank, we gained plenty of under-seat real estate, which O’Brien used to anchor the XS Power D1200 battery and MSD 6A box. Dynamat Xtreme sound deadener was used throughout the cab to isolate vibration, stop noise, and reduce heat, all from Speedway Motors.
1946 Chevy in the process of restoration
31. Finally back on all fours, thanks to a set of fresh steelies and big ‘n’ little rubber from Coker tire, it won’t be long till the Art Deco–Series hauler hits the street with an entirely new stance and personality. Stay tuned!
SOURCES