CTP Tech
InTheGarageMedia.com
plumbing a disc brake system
Plumb Perfection
Bending, Flaring, and Forming Stainless Steel Brake Lines
BY Ryan Manson
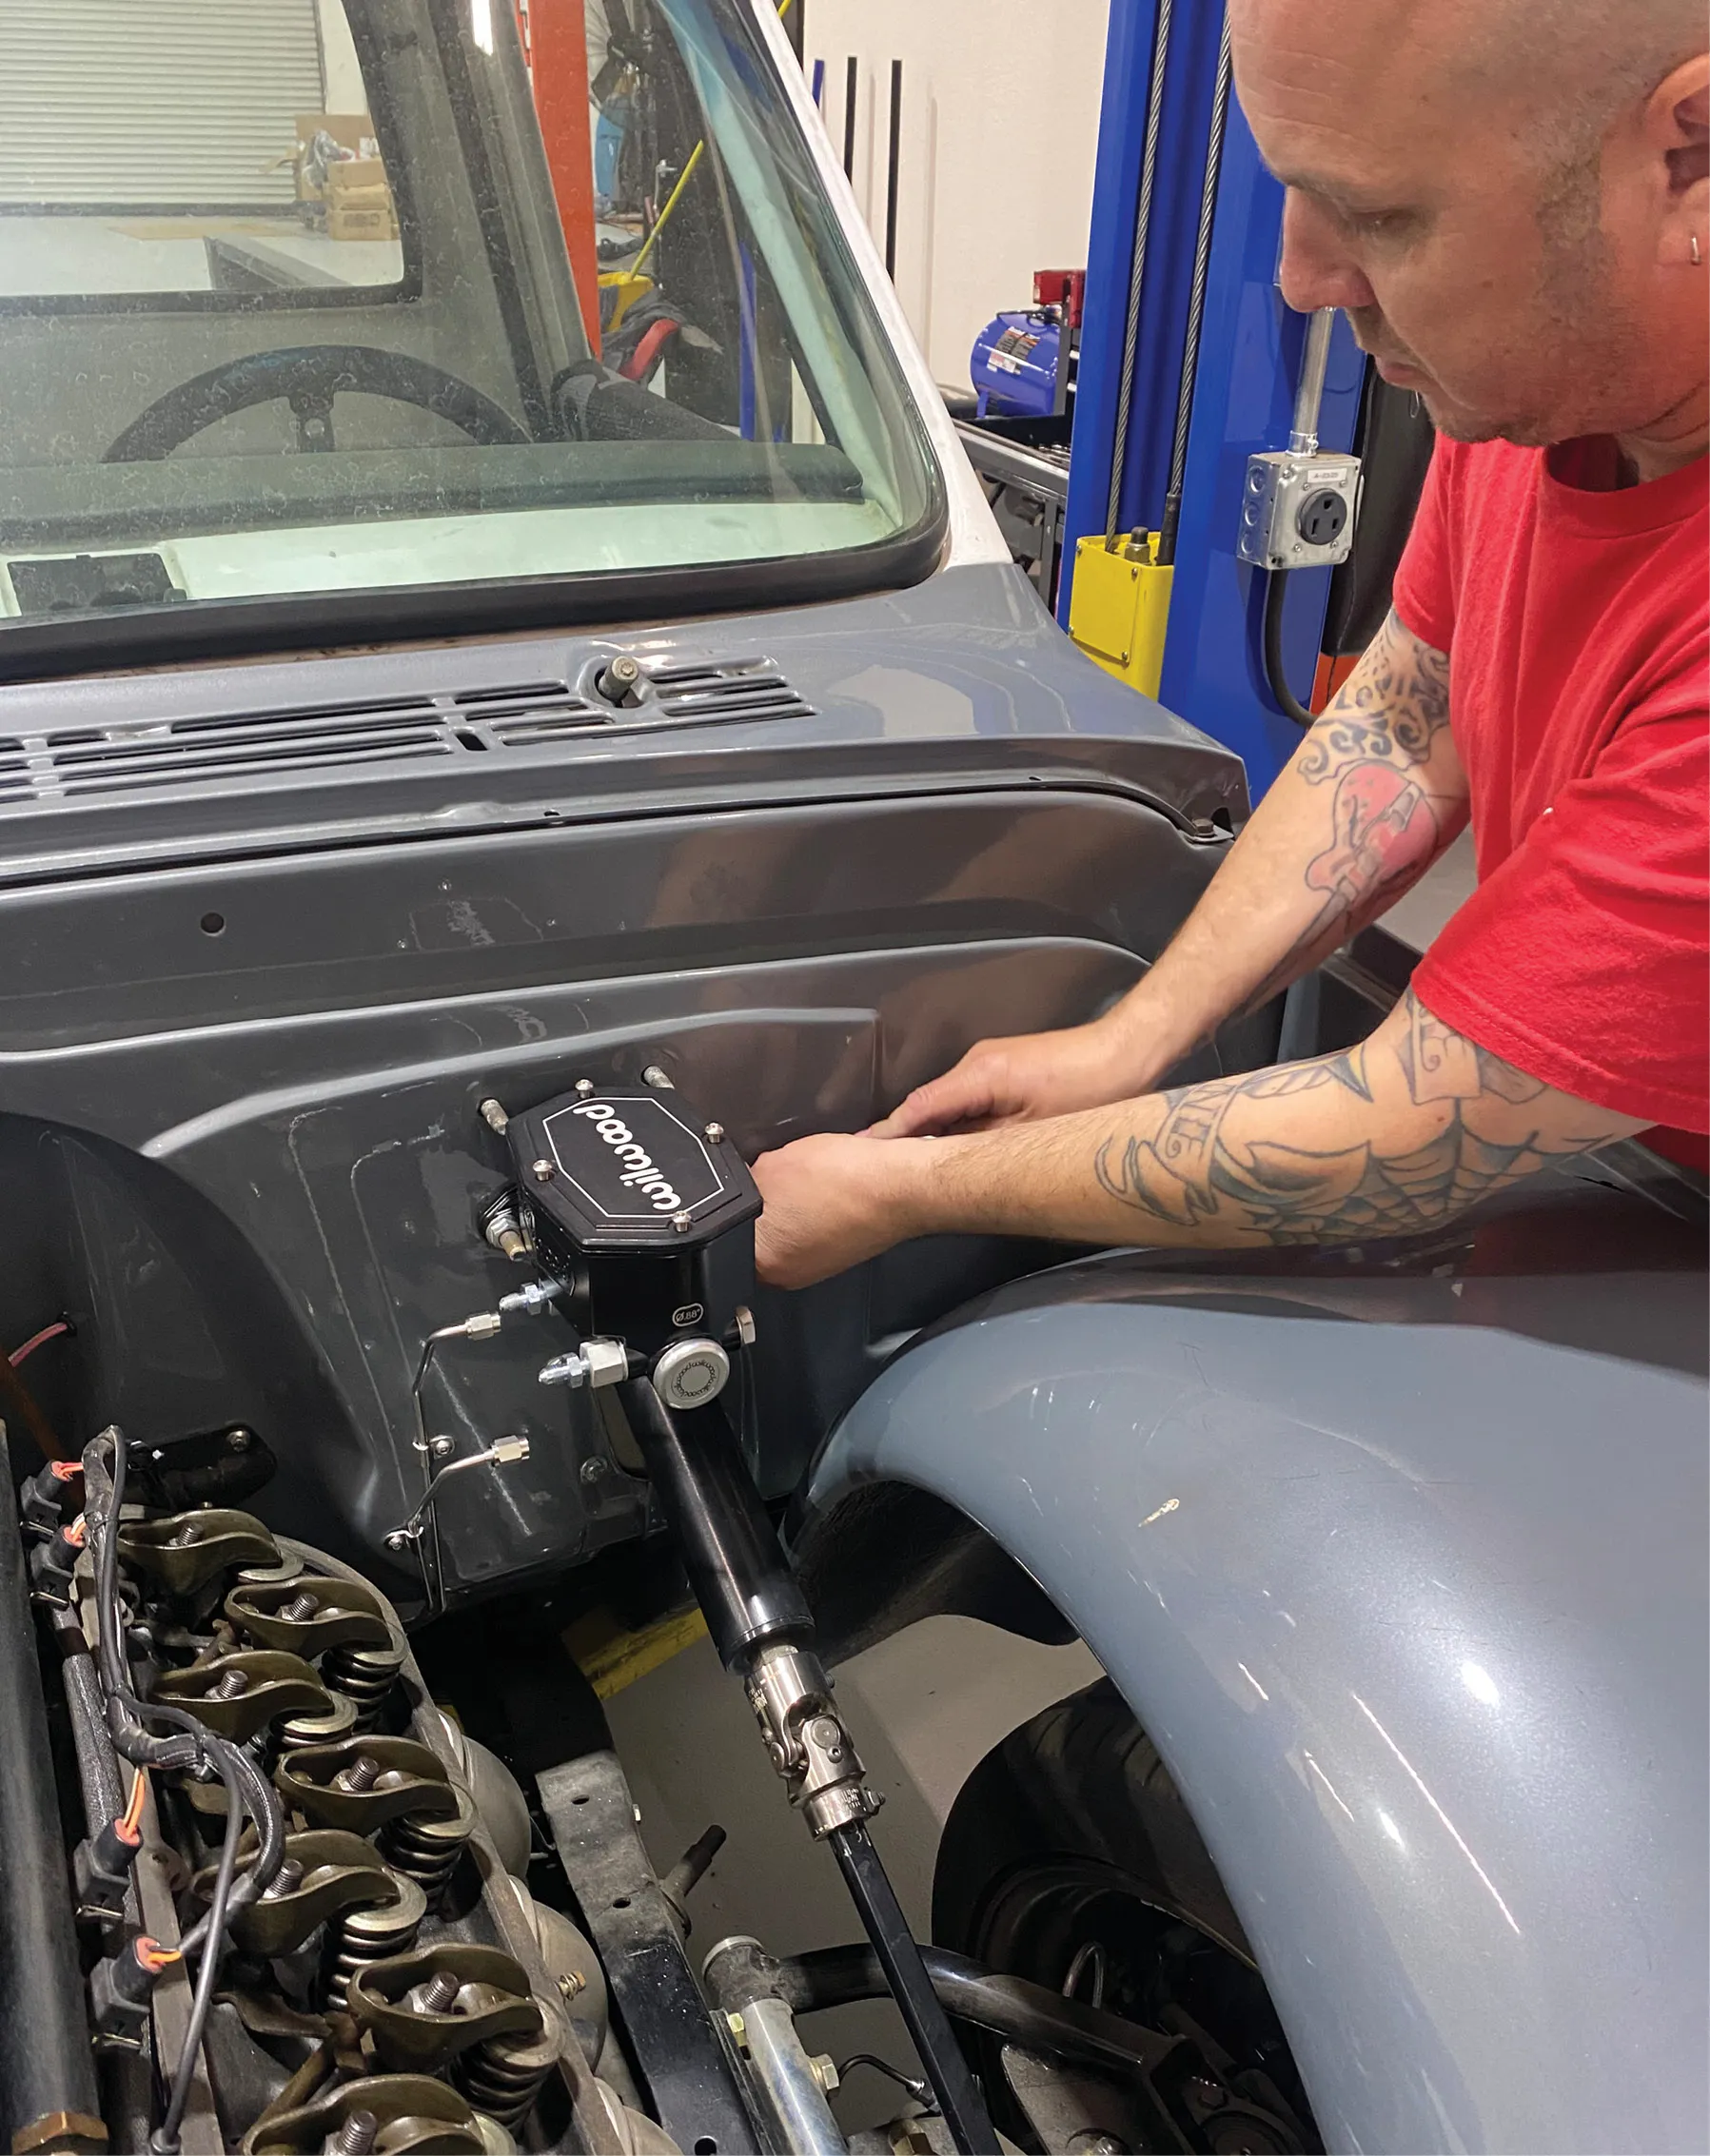
Photography BY The author
Videography by Ryan Foss Productions
W

hen it comes to plumbing a disc brake system, you’ll find as many opinions as you will options when it comes to everything from line size to material, flaring techniques, and hardware. Here at the Clampdown Competition garage, we’ve had great experience using a simple kit from Speedway Motors, in addition to a handful of various fittings and hardware. So, when Editor Fortier invited me out to the ITGM Tech Center with the request to plumb his C10 project, I only had one request: contact Speedway and get one of their stainless steel brake line kits on its way.

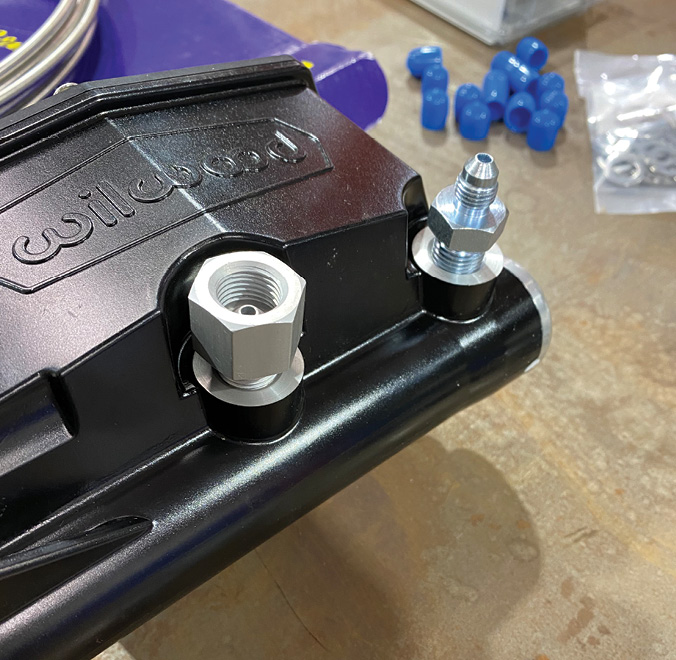
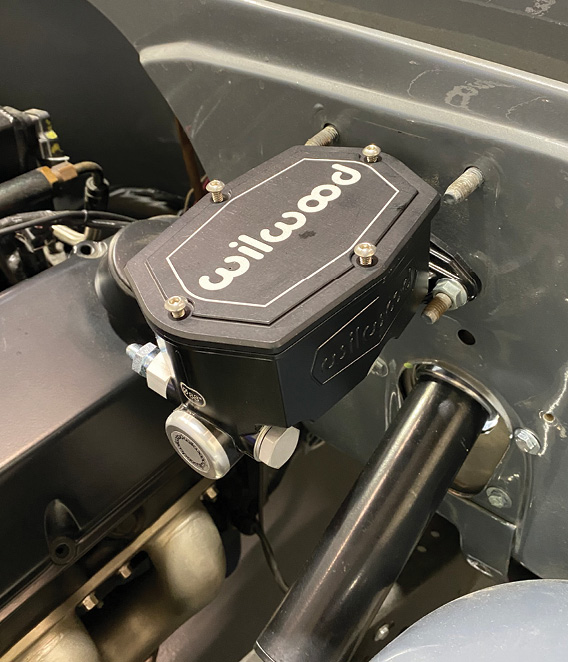
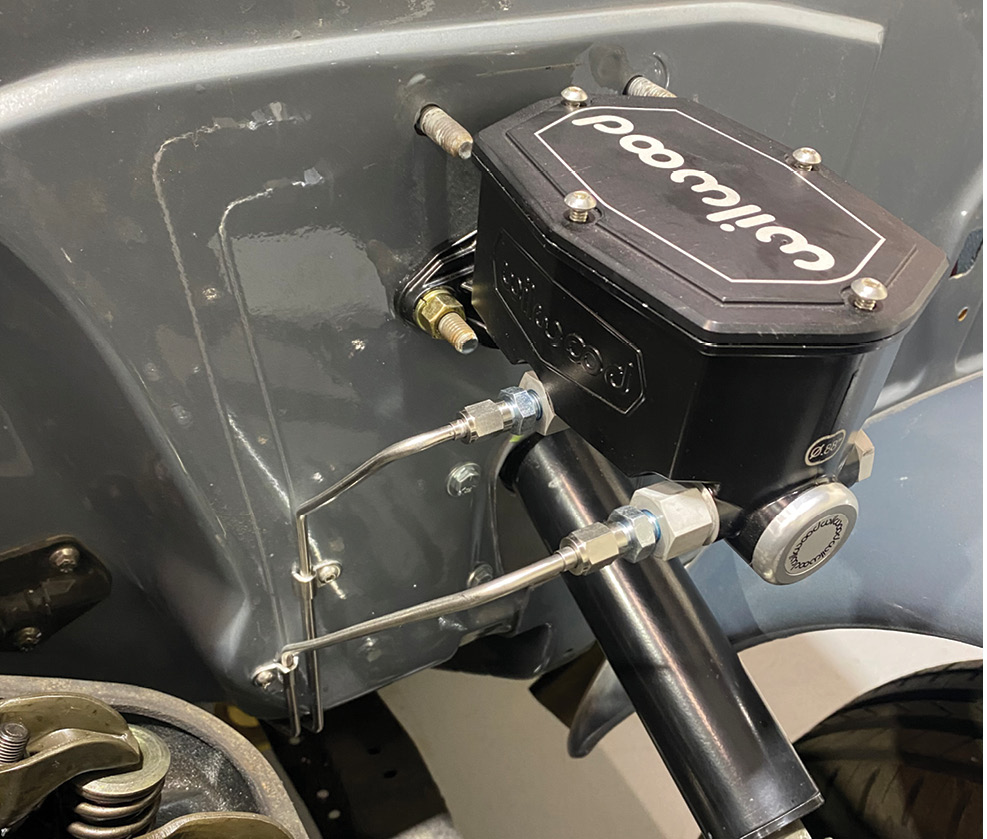
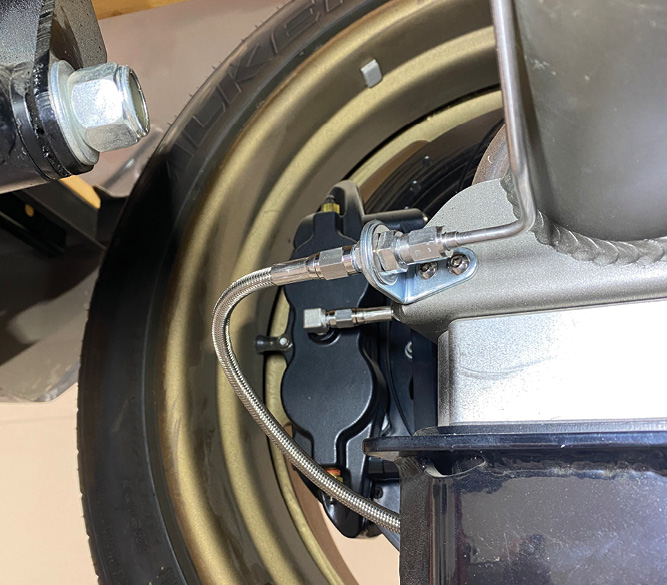
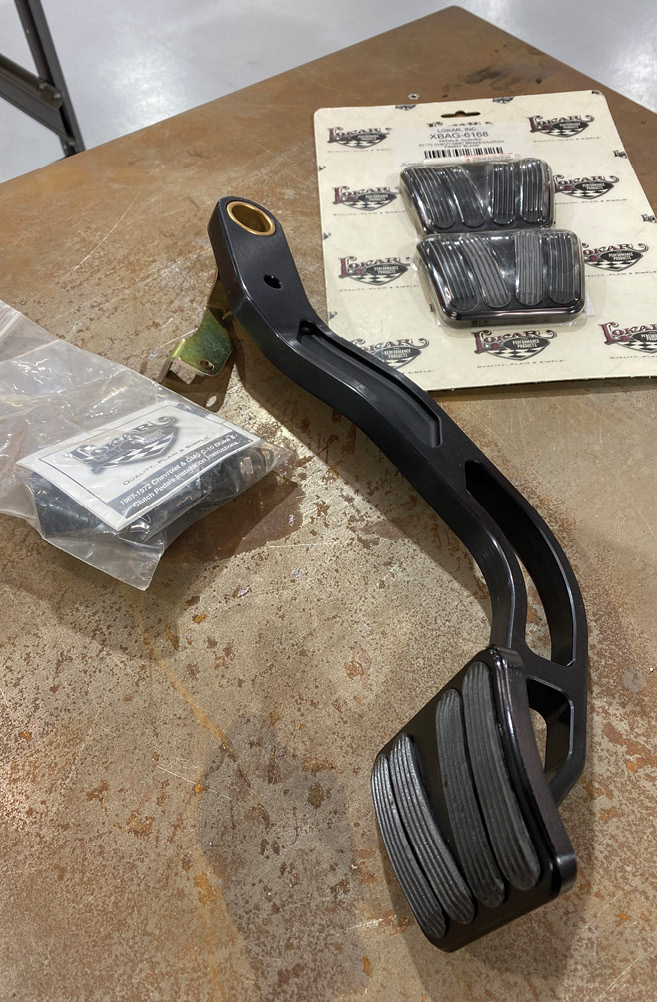
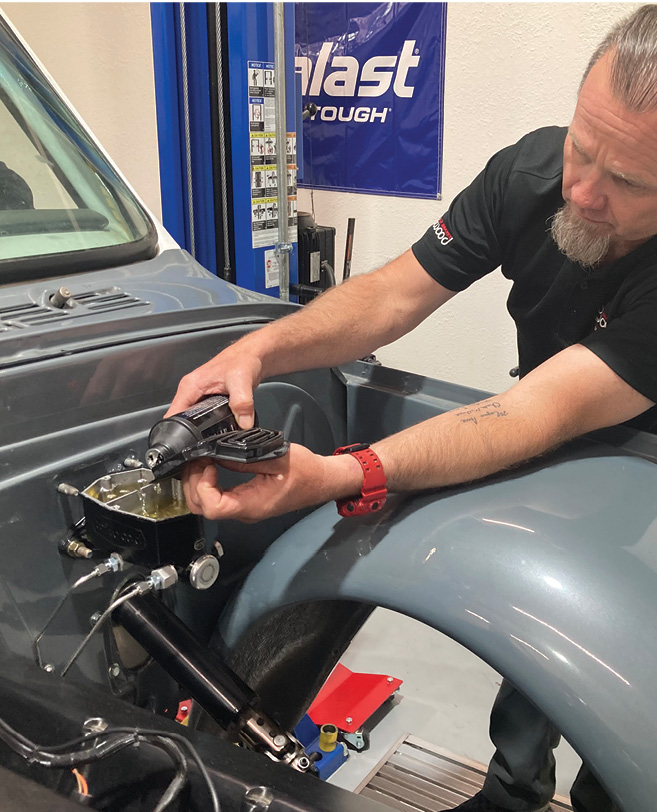
Rob’s truck was already a roller—that is it already had a full complement of Wilwood disc brake components bolted both front and aft. As we mentioned, it was lacking in plumbing but it was also lacking a brake pedal, linkage, and master cylinder. With the part numbers of both the front and rear calipers in hand, Rob contacted Mike Hamrick at Wilwood Disc Brakes, who recommended the correct size (7/8 inch) for Rob’s setup in a manual brake design. Inside the cab, a Lokar Performance Products Direct-Fit billet aluminum brake arm will handle the task of transmitting the pedal pressure to the master cylinder, adding a little style all the while.

Working with stainless steel can be more difficult than some of the modern brake line materials, Ni-Cop for instance, but as far as aesthetics go, it’s our favorite. While perfecting a double-inverted flare in stainless can be something of a black art, executing a flawless 37-degree flare to couple with an AN tube and nut isn’t given the proper tools. We also like the fact that the stainless lines and hardware won’t oxidize anywhere near as much as their steel counterpart and can be polished to perfection, if so desired. In addition to the proper flaring tools, a decent array of benders is also a must when it comes to forming perfect brake lines, and we have the gamut covered from a super-tight radius bender from Classic Performance Products (CPP) to a more traditional radius bender from Speedway Motors. Of course, after all those lines are bent up, we can’t have them banging around under the truck, so a handful of stainless line clamps from Kugel Komponents were ordered up to keep things nice and tidy.

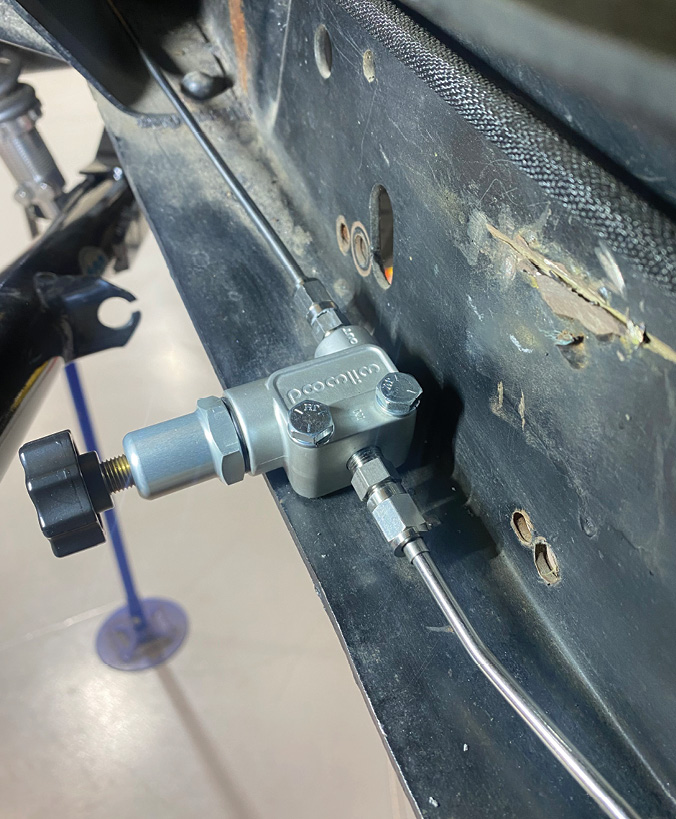
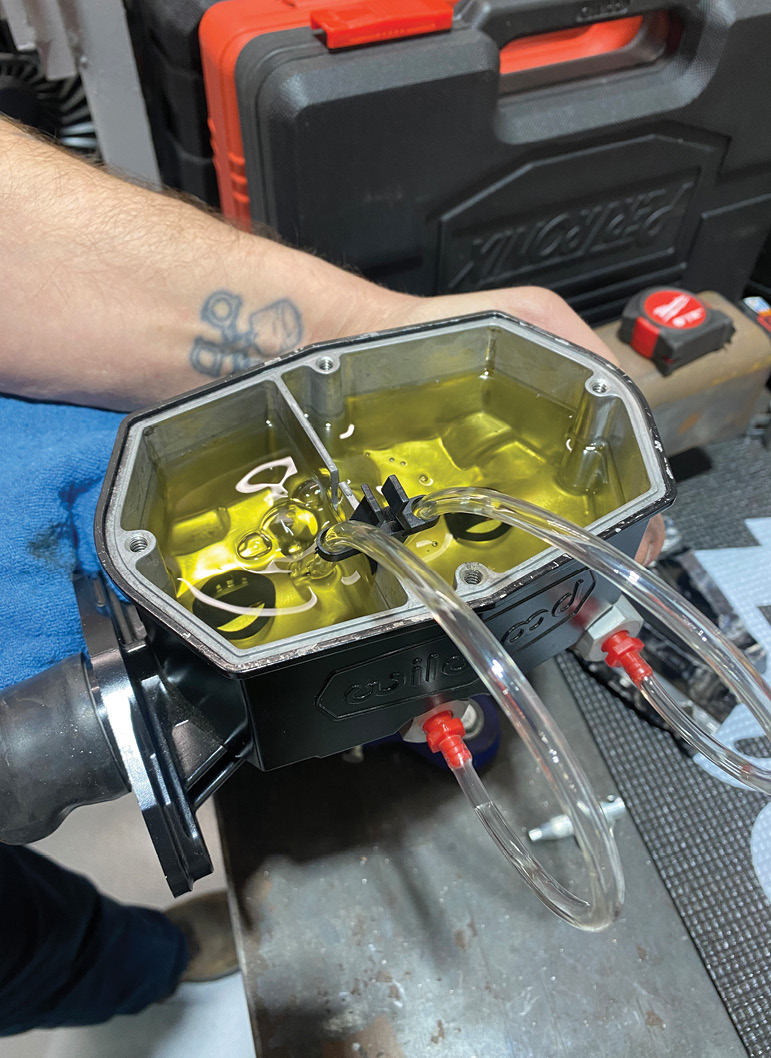
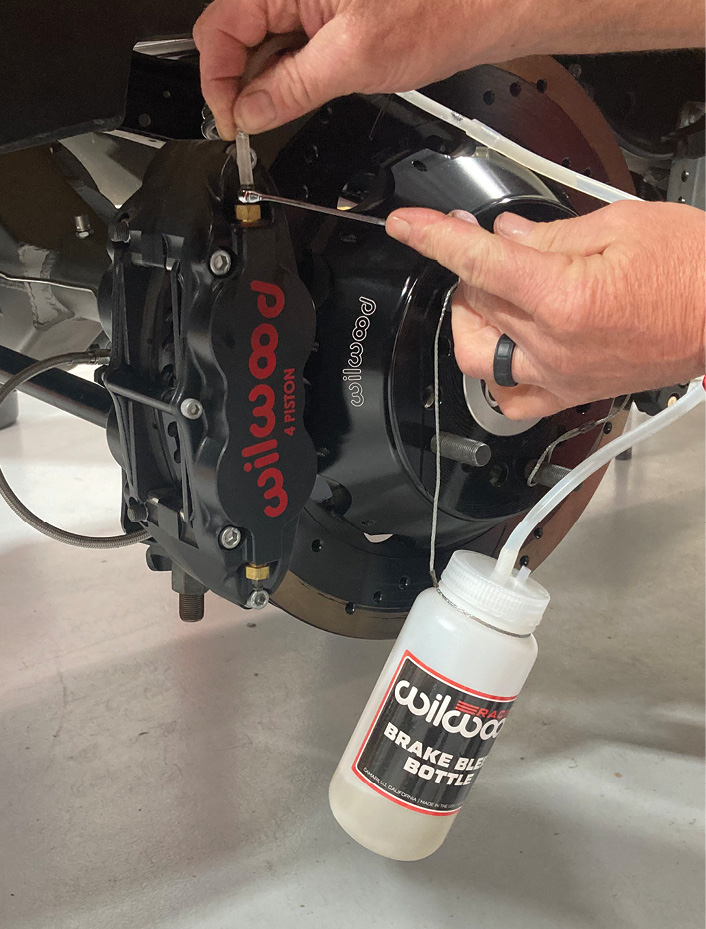
Once the system is plumbed, it still needs to be bled the old-fashioned way, but not until the master cylinder receives a bench bleeding. This ensures that no air is trapped inside the master’s valving that could cause problems down the road. After the master cylinder is bench bled, it’s reinstalled on the firewall and the lines reattached, then it’s time to get to cracking each caliper’s bleeder valve, starting with the furthest from the master cylinder. Slowly but surely the air was worked out of the system until we achieved a nice, solid pedal. From there, it’s time for a drive and a few brake system checks to correctly bed in the brake pads and adjust the rear proportioning valve.

Speedway Motors Stainless Steel AN-3 Brake Line Kit (PN 6178540)
1. We’ll be using a Speedway Motors Stainless Steel AN-3 Brake Line Kit (PN 6178540) to plumb the entire C10. This particular kit comes with 20 feet of 3/16-inch stainless steel tubing, plenty of AN-3 tube nut and sleeve fittings, two bulkhead tees, six AN-3 to 1/8-inch NPT adapters, an AN-3 straight bulkhead fitting, two through-frame fittings, and four 18-inch AN-3 stainless braided hoses. When it comes to working with stainless, it should be noted to be sure to use an antiseize paste liberally on all threaded joints.
When it comes to making those perfect bends, there isn’t any one magic tool but rather a myriad of different benders, with different radii to boot.
The tool on the left is a trick, ultra-tight radius bender available from CPP, while the black bender is handy to have on-hand as it is capable of bending a variety of different-sized tubing.
2-3. When it comes to making those perfect bends, there isn’t any one magic tool but rather a myriad of different benders, with different radii to boot. The tool on the left is a trick, ultra-tight radius bender available from CPP, while the black bender is handy to have on-hand as it is capable of bending a variety of different-sized tubing.
Sometimes, getting the proper curve takes a little bit of imagination. Anything with the correct radius can become a die when it comes to bending brake lines; welding tanks, wheels, even engine pulleys.
4. Sometimes, getting the proper curve takes a little bit of imagination. Anything with the correct radius can become a die when it comes to bending brake lines; welding tanks, wheels, even engine pulleys.
Like any job, careful planning usually yields the best results, and it’s no different when it comes to planning a brake line system. Here, I’ve laid out all the various tees, fittings, valves, and other components for a previous job to ensure we had everything on hand before a single line was bent or flared.

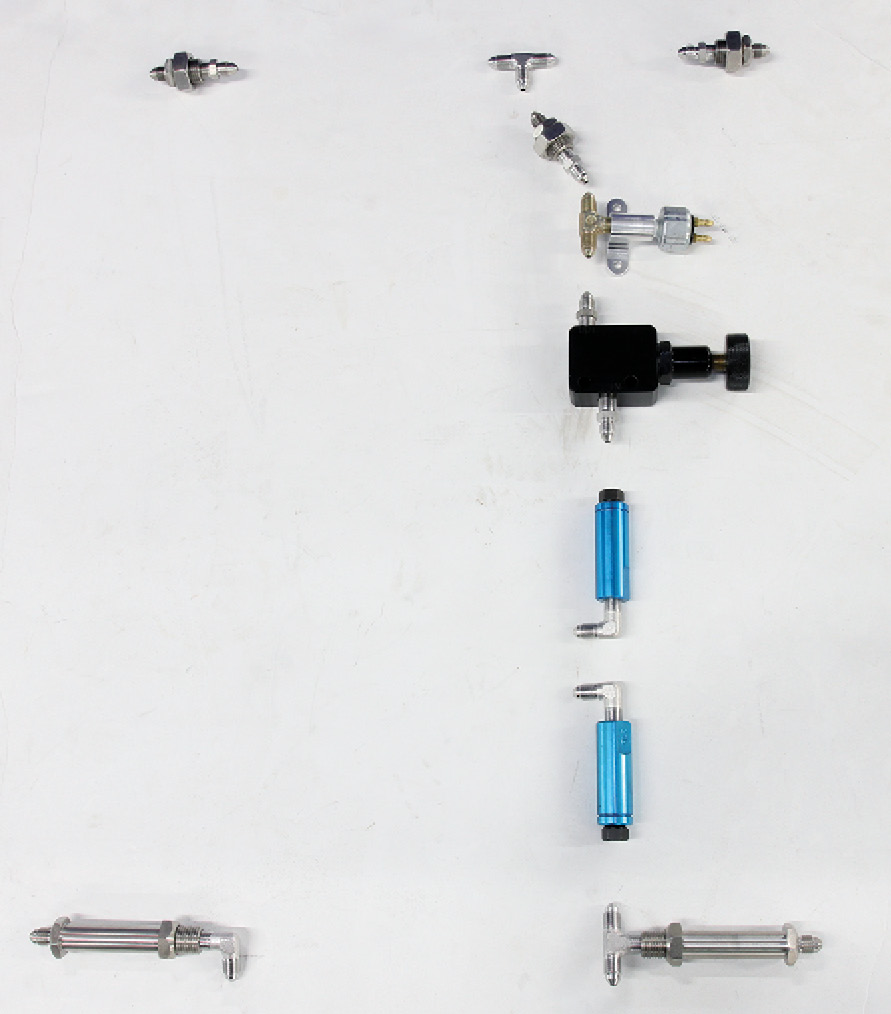
5. Like any job, careful planning usually yields the best results, and it’s no different when it comes to planning a brake line system. Here, I’ve laid out all the various tees, fittings, valves, and other components for a previous job to ensure we had everything on hand before a single line was bent or flared.

Cutting hard brake lines can be achieved a number of ways; regardless of method, the goal is a nice, square cut.
cutting hard brake lines
6-7. Cutting hard brake lines can be achieved a number of ways; regardless of method, the goal is a nice, square cut.
Deburring can also be done via a number of methods, one of which is seen here using a deburring tool available from CPP.
8. Deburring can also be done via a number of methods, one of which is seen here using a deburring tool available from CPP.
We’ll be making single, 37-degree flares for all our hardline junction points using this Ridgid flaring tool available from Speedway Motors (PN 91089524). This tool is simple to use and works great if you don’t want to deal with a bench-mounted flaring tool (we have one of those too!).
9. We’ll be making single, 37-degree flares for all our hardline junction points using this Ridgid flaring tool available from Speedway Motors (PN 91089524). This tool is simple to use and works great if you don’t want to deal with a bench-mounted flaring tool (we have one of those too!).
An acceptable 37-degree flare looks something like this. Careful inspection ensures the end of the flare is free of any burrs and/or cracking that might appear during the forming of the flare, a common failure point when using stainless steel typically due to work hardening of the material, incorrect technique, or lackluster tooling.
10. An acceptable 37-degree flare looks something like this. Careful inspection ensures the end of the flare is free of any burrs and/or cracking that might appear during the forming of the flare, a common failure point when using stainless steel typically due to work hardening of the material, incorrect technique, or lackluster tooling.
The business end of an AN-3 hardline (or any AN hardline for that matter) consists of a nut and sleeve, 37-degree flare tube, and the corresponding fitting.
11. The business end of an AN-3 hardline (or any AN hardline for that matter) consists of a nut and sleeve, 37-degree flare tube, and the corresponding fitting.
Traditional 45-degree inverted flares can be made using 3/16-inch stainless steel, they just take a little patience, technique, and a good flaring tool.
12. Traditional 45-degree inverted flares can be made using 3/16-inch stainless steel, they just take a little patience, technique, and a good flaring tool.
Our 3/16-inch brake line came packaged in roll form, so it will be necessary to straighten it out in sections as we work. Speedway Motors’ Handheld Tubing Straightener (PN 910316) gets the job done and the results are pretty darn straight!
13. Our 3/16-inch brake line came packaged in roll form, so it will be necessary to straighten it out in sections as we work. Speedway Motors’ Handheld Tubing Straightener (PN 910316) gets the job done and the results are pretty darn straight!
Wilwood’s master cylinder (PN 260-14957-BK) comes with a variety of fittings to mate hard lines to the front and rear master cylinder ports. Special fittings are necessary to convert them from 45-degree inverted flare to AN however, shown here.
14. Wilwood’s master cylinder (PN 260-14957-BK) comes with a variety of fittings to mate hard lines to the front and rear master cylinder ports. Special fittings are necessary to convert them from 45-degree inverted flare to AN however, shown here.
We’re going to start at the master cylinder and work our way toward each disc brake caliper. The rear will consist of a single line that will mate to a hose before connecting to the rearend, splitting off from there to the respective left and right calipers, while a single front line will “tee” at the driver side, heading across the front crossmember to the passenger side caliper.
15. We’re going to start at the master cylinder and work our way toward each disc brake caliper. The rear will consist of a single line that will mate to a hose before connecting to the rearend, splitting off from there to the respective left and right calipers, while a single front line will “tee” at the driver side, heading across the front crossmember to the passenger side caliper.
Building brake lines can be a process of uncertainty, but when it comes to routing them from the master cylinder and down the firewall, the key is keeping them parallel and straight. Two techniques can be used for this end, depending upon one’s experience and sometimes, plain luck. The first involves a few measurements made to determine the offset between the master cylinder and the firewall ...
16. Building brake lines can be a process of uncertainty, but when it comes to routing them from the master cylinder and down the firewall, the key is keeping them parallel and straight. Two techniques can be used for this end, depending upon one’s experience and sometimes, plain luck. The first involves a few measurements made to determine the offset between the master cylinder and the firewall …
... carefully translated to the line itself ...
17. … carefully translated to the line itself …
... and bent to suit.
18. … and bent to suit.
The second technique is where experience and luck can come into play.
Marking the line approximately where the bend will begin and freehanding things from there.
19-20. The second technique is where experience and luck can come into play. Marking the line approximately where the bend will begin and freehanding things from there.
Regardless of the technique used, the finished lines should be routed clear of any obstruction and away from any heat source in as clean a manner as possible. This angle isn’t the best to illustrate their relation, but the reflection in the firewall just happens to speak volumes.
21. Regardless of the technique used, the finished lines should be routed clear of any obstruction and away from any heat source in as clean a manner as possible. This angle isn’t the best to illustrate their relation, but the reflection in the firewall just happens to speak volumes.
Down under the cab, a union fitting was installed on both the front and rear lines for ease of fabrication and future disassembly, if need be. Here, the rear brake line heads toward the back of the truck while the front has yet to be fabricated. A couple stainless line clamps from Kugel Komponents ensure the lines stay put.
22. Down under the cab, a union fitting was installed on both the front and rear lines for ease of fabrication and future disassembly, if need be. Here, the rear brake line heads toward the back of the truck while the front has yet to be fabricated. A couple stainless line clamps from Kugel Komponents ensure the lines stay put.
A Wilwood adjustable proportioning valve (PN 260-10922) is installed midway on the rear brake line to ensure proper brake bias between the front and rear brakes, an important addition for proper brake control on a pickup truck due to their front-to-rear weight bias. The line exiting the prop valve has yet to be bent to suit and is only installed for mockup at the moment.
23. A Wilwood adjustable proportioning valve (PN 260-10922) is installed midway on the rear brake line to ensure proper brake bias between the front and rear brakes, an important addition for proper brake control on a pickup truck due to their front-to-rear weight bias. The line exiting the prop valve has yet to be bent to suit and is only installed for mockup at the moment.
A bulkhead fitting is used at the rear of the truck to mate the hardline to a stainless braided hose that connects to a “tee” on the rearend.
24. A bulkhead fitting is used at the rear of the truck to mate the hardline to a stainless braided hose that connects to a “tee” on the rearend.
On the rearend itself, a stainless braided hose attaches to each caliper at one end and a bulkhead fitting, mounted to a tab that’s attached to the rearend housing, at the other. This lends for easy maintenance of the calipers in the case of brake pad replacement, and so on.
25. On the rearend itself, a stainless braided hose attaches to each caliper at one end and a bulkhead fitting, mounted to a tab that’s attached to the rearend housing, at the other. This lends for easy maintenance of the calipers in the case of brake pad replacement, and so on.
A section of hardline connects each braided hose to a brake “tee” mounted on another tab affixed to the rearend housing. The top of this “tee” connects to the opposite end of the aforementioned stainless braided hose coming from the chassis.
26. A section of hardline connects each braided hose to a brake “tee” mounted on another tab affixed to the rearend housing. The top of this “tee” connects to the opposite end of the aforementioned stainless braided hose coming from the chassis.
Back under the front of the cab, the brake line for the front brake system has been fabricated and sent toward the front crossmember.
27. Back under the front of the cab, the brake line for the front brake system has been fabricated and sent toward the front crossmember.
A “tee” is used up front to split the line between ...
28. A “tee” is used up front to split the line between …
... the driver side ...
29. … the driver side …
... and passenger side frame-mounted brake tabs, both terminated with a brake clip and attached to another braided hose.
30. … and passenger side frame-mounted brake tabs, both terminated with a brake clip and attached to another braided hose.
The brake line system built, it’s time to bench bleed the master cylinder. This is necessary to get all the air out of the master and is best accomplished on the bench since the full stroke of the master can be achieved, something that may not be possible using the vehicle’s brake pedal.
31. The brake line system built, it’s time to bench bleed the master cylinder. This is necessary to get all the air out of the master and is best accomplished on the bench since the full stroke of the master can be achieved, something that may not be possible using the vehicle’s brake pedal.
A Lokar Direct-Fit Brake Pedal Arm (PN XBCA-9508) is going to replace the stock C10 pedal, mated to a Wilwood master via their Pushrod Kit (PN 330-13914). Lokar’s pedal retains the stock manual brake pedal ratio. Coupled with the correct-sized master cylinder (7/8 inch for our application), this setup yields a firm pedal feel without the need for a brake booster.
This results in an effortless pedal while giving the driver more feedback when it comes to brake modulation and performance
32-33. A Lokar Direct-Fit Brake Pedal Arm (PN XBCA-9508) is going to replace the stock C10 pedal, mated to a Wilwood master via their Pushrod Kit (PN 330-13914). Lokar’s pedal retains the stock manual brake pedal ratio. Coupled with the correct-sized master cylinder (7/8 inch for our application), this setup yields a firm pedal feel without the need for a brake booster. This results in an effortless pedal while giving the driver more feedback when it comes to brake modulation and performance.
Mike Hamrick adds Wilwood brake fluid to the master cylinder in preparation to the final step, bleeding the system.
34. Mike Hamrick adds Wilwood brake fluid to the master cylinder in preparation to the final step, bleeding the system.
As Rob methodically pumps the pedal, Hamrick works his way around the truck, starting at the furthest caliper, carefully bleeding the air out of the system. Once bled, it’s up to Rob to properly bed the brake pads and adjust the brake proportioning valve so that the rear brakes don’t lock up before the fronts.
35. As Rob methodically pumps the pedal, Hamrick works his way around the truck, starting at the furthest caliper, carefully bleeding the air out of the system. Once bled, it’s up to Rob to properly bed the brake pads and adjust the brake proportioning valve so that the rear brakes don’t lock up before the fronts.
Tech Center - Duralastparts.com / Frontiersupplies.com
 SOURCES
Clampdown Competition
clampdowncomp.com
Classic Performance Products
(800) 760-7438
classicperform.com
Kugel Komponents
(562) 691-7006
kugelkomponents.com
Lokar Performance Products
(877) 469-7440
lokar.com
Speedway Motors
(800) 979-0122
speedwaymotors.com
Wilwood Disc Brakes
(805) 388-1188
wilwood.com