CTP Tech
InTheGarageMedia.com
Proper Stoppers
Blue Chevy OBS truck with Wilwood 6-piston blue caliper and boxed brake kit components
BY Jessica RoachIMAGES BY THE AUTHOR
Wilwood’s New XRS Discs … for OBS!
B

y far, one of the most rewarding upgrades someone can make on their vehicle is brakes. Let’s come to a quick understanding: If you haven’t been directly affected already, stock brakes on 1988-98 Chevys are not a favorite. Sure, there are tips, tricks, and a million how-to YouTube videos on adjusting and reusing GM brake parts to more affordably fit your needs and get you by. But when you are simply tired of random brake fade, weird noises, ugly drum brakes, and constant adjustment, a disc brake upgrade all around is the easiest solution. It may sound scary to most to completely tear off the die-hard GM brakes, but by popular opinion over the years, a disc brake upgrade is not only less maintenance, but incredibly easier and cleaner to work on. 

America’s most beloved and utilized truck deserves better braking power, especially when some are pushing 500-plus horsepower. But who to rely on with a complete kit that doesn’t require crazy and unnecessary work? Well, with over 20-plus years of experience installing Wilwood products on high-performance muscle cars, everyday driver trucks, and hot rods, to us it was more a question of what do they offer for 1988-98 Chevy trucks? Fortunately, we learned last year of their new XRS calipers rolling out: a street version of the XRZ race calipers with a forged aluminum body, increased caliper stiffness, and just as lightweight.

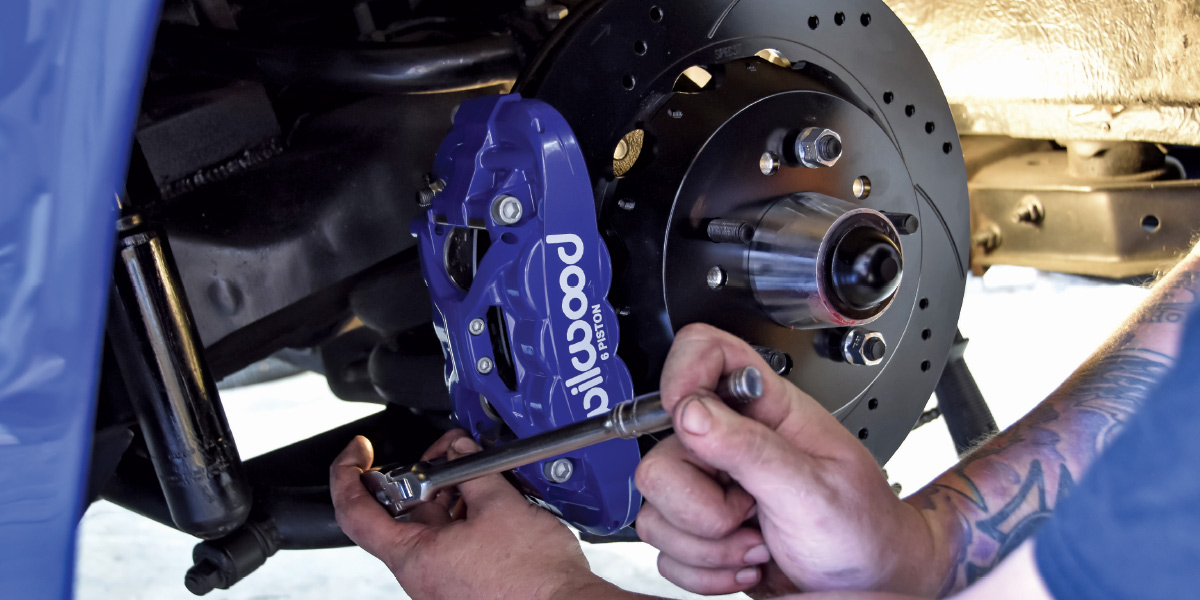
We installed this kit with control arms that had been modified for a “body-dropped” truck and Belltech spindles, and as we expected it did not require us to do any modifying to make the new spindle fit. We always recommend following the very informative and helpful instructions provided with each kit and always reach out to the Wilwood team if for some reason you may be having trouble. Remember that we may have done a few things a little differently than the instructions; be sure to assess appropriately and do what works for you.

In this “brakedown” install, you will see how well Wilwood delivered on putting together an exceptionally nice, high-performance, straightforward install you can 100 percent do in your home garage—just like us! Stay tuned for next month when we wrap up the rear discs and install Wilwood’s proprietary master cylinder.

Original OBS Chevy truck brake rotor and hub assembly showing rust and wear
1. Start the takeoff of your stock brakes, including the spindle.
Side-by-side comparison of original brake backing plate and new Wilwood mounting bracket
2. Our original spindle is Belltech, the most common choice for a “sport truck” and the geometry versus Wilwood is almost identical, with a main difference being the provisions made for stronger caliper mounting—(two) 5/8-18 bolts create a sturdier mount point. 
Wilwood caliper bracket installed on OBS Chevy truck spindle
3. After removing the stock spindle, slide the Wilwood spindles on just as you would the stock ones—they fit exactly the same—and bolt them on for good. Be sure to take the time to replace any bad ball joints or boots.
Installation tool aligning Wilwood brake components on truck spindle copy
4. Apply a small amount of grease on your spindle shaft ahead of time before sliding the bearing/hub on.
Wilwood machined aluminum hub adapter being mounted to OBS Chevy truck
5. We decided to use the wheel as a vise to prevent damage to the hub and confirm the lug pattern needed. You do not have to do it this way, but however you choose, just make sure the bolt pattern is correct and you don’t damage the hub.
Technician installing Wilwood hub assembly with socket wrench on wheel studs
Torque wrench being used to properly secure Wilwood hub adapter bolts
6-7. Once the lug pattern is confirmed, remove studs one by one and reinstall using red Loctite and supplied torq specs from Wilwood.
Drilled and slotted Wilwood performance rotor installation on OBS Chevy truck
8. While the wheel was on ground, we decided it would be easier to assemble the rotors to help prevent unnecessary damage. Using blue Loctite on each stud, torq to supplied specs. Again, not everyone has to do it this way, it’s just a preference. For added safety you can safety wire the bolts per Wilwood’s instruction.
Hub bearing assembly being packed with red grease during Wilwood brake installation
9. Set your hub on a flat surface, lay your bearing inside, lay your seal on top, and gently tap the surface edge in a square pattern to ensure evenness on the way down. You will know you are done when it stops moving. Do the same for the ABS pickup ring as pictured.
wheel bearing completely immersed in grease
10. The fun part! To each their own on this process, just make sure it’s packed full. Always use a high-temp wheel bearing grease.
Hands installing machined aluminum wheel hub with threaded studs visible
11. Slide the hub onto the spindle until it bottoms out. Adding everything we just did will give it a snug fit as you push it on. 
Technician installing bearing or seal in hub center with red assembly grease
12. Install the front bearing—packed with high-temp grease—push inside until it sits against the race inside.
Close-up of wheel hub center showing bearing component with red assembly grease
13. Install supplied spindle washer, nut, and cotter pin. Tighten the castle nut until there is no play in the bearing and it still spins freely.
Underside view showing Wilwood bracket mounted to spindle with aluminum hub installed
Black drilledslotted performance rotor being installed with socket tool on wheel hub
14-15. Loosely install the caliper bracket to check fitment, slide your rotor on, and use your lug nuts so the rotor is seated against the hub. 
Blue Wilwood caliper mounted to black bracket with drilled performance rotor visible
16. Slide the caliper on—it’s just that simple. Studs on the bracket help guide it into place. Snug the provided 12-point nut for now. 
Technician installing caliper mounting bracket bolt in brake assembly
Close-up of brake caliper bleeder screw with wrench during installation process
17-18. Using supplied shims from Wilwood, space your caliper bracket until both brake pads are centered on the rotor. Remove the caliper and install pads using retainer pins. Take out and reinstall hardware with red Loctite and supplied torq specs.
Stainless steel braided brake line being connected to blue Wilwood caliper fitting
19. Install the brake line fitting supplied by Wilwood using thread sealer. You can do this before or after the install.
Completed installation showing brake line connected to blue Wilwood caliper
20. Wilwood also supplies a braided stainless soft line allowing for suspension travel.
Stainless steel braided brake line connected to caliper fitting with banjo bolt
21. To adapt the Wilwood soft line to the factory steel brake line, use the supplied adapter and retainer clip in the kit.
Completed Wilwood brake installation showing blue 6-piston caliper mounted to black drilledslotted rotor with wheel hub visible
Close-up of a black American Racing wheel featuring a high-performance blue Wilwood brake caliper and drilled rotors.
22-23. Take this time to get your wheel on, check brake backspacing and overall wheel backspacing. Visually this setup is a significant upgrade. In just a matter of a few hours, the frontend is completely transformed. This new caliper is called the XRS, a street version of the XRZ calipers, just as light and stiff with the same cooling benefits. Offered in a variety of custom color combinations, we chose Infineon Blue with white writing. Wilwood is proving once again why they are number 1 at a reliable, proven, and stylish yet simple brake upgrade.